I'm quite proud of this mod. Reposting from a year or two ago in case it's of interest to anyone!
I like the Nielex retro electric window switches and thought it'd be interesting to make something similar.
I ended up with these:
I've posted pics up on a few of the MX5 forums and given the interest thought it worth doing a post on how you can make these yourselves.
What you'll need:
* 1x stainless steel plate, cut to a rectangle 66x52mm. The radius of the corners is exactly the same as a UK penny coin.
* 2x toggle switches. You need Double Pole, Double Throw (DPDT), ON/OFF/ON momentary switches. I got mine from Parts Express and a friend shipped them to me in the UK but i"ve since found them here:http://www.cbsonline.co.uk/knurled-ring-toggle-switch-off-on-on-spring-return-double-pole-tskrspr2-5880-p.asp
EDIT: just noticed these are OFF-ON-OFF which isn't correct - you need ON-OFF-ON switches.
* 2x toggle switch hoop guards. http://www.cbsonline.co.uk/toggle-switch-guard-swguard-3583-p.asp
* 12 ring or fork crimp connectors and some lengths of 10 gauge automotive wire.
* A Mazda plastic blanking plate from a manual-window NA Eunos Roadster/MX5 or Miata, or a spare electric window plastic switch panel that you will need to cut up.
* A couple of nice nuts and bolts.
Starting off
Remove the center console. There are two screws either side of the gearstick on the sides of the console, and a screw underneath the ashtray, and two screws in the rear cubby hole. Unscrew the gearknob and lift up the console from the front and guide it forward over the boot release levers.
Disconnect the ashtray bulb and the existing electric window switch and remove the console - you can work on the rest of this inside in the warmth!
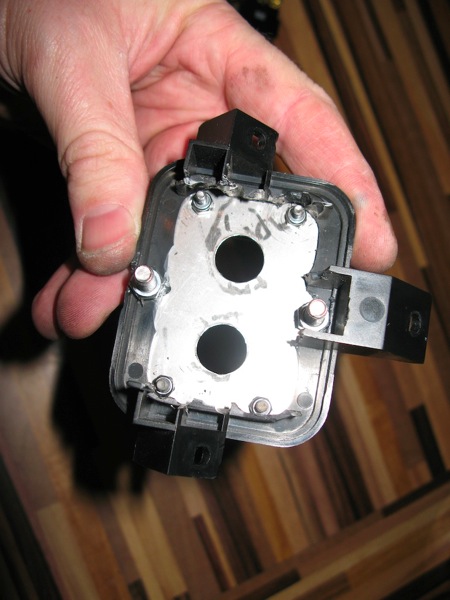
Take your plastic blanking plate, or your spare electric window switch panel. I used the latter, which required the switches removing and cutting out all the excess plastic to give me a flat plate. I used a small drill bit and some pliers to drill and snap the excess plastic, which gave me this:
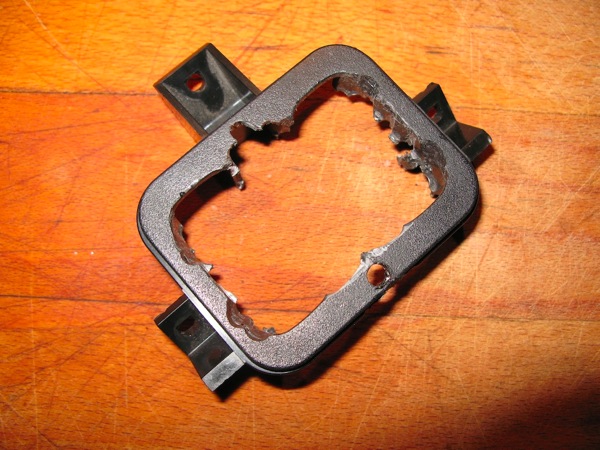
I would imagine if you start off with a manual-window blanking plate this would be even easier.
I then cut a couple of cardboard templates to match the stainless steel plate, measured up the placement of the holes and then used a pin to make matching holes on the second piece of card. One of these pieces became the template, the other had holes cut in it so I could test fit the switches and hoops to see what they looked like.
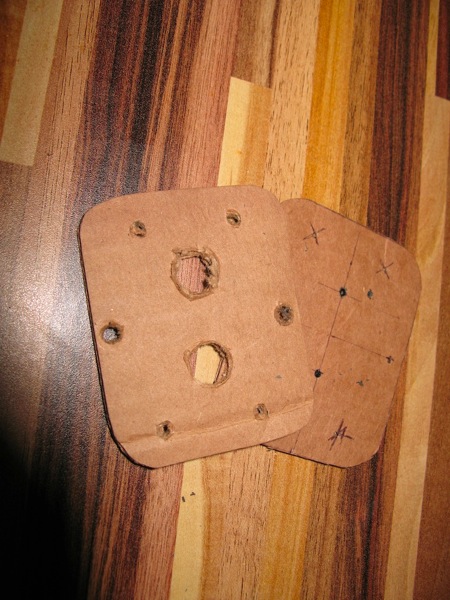
The toggles need a 12mm hole, the hoops a 3mm hole and the caphead bolts I used a 6mm hole.
I used some flat head screws and screwed the plate to a plank so it wouldn't move, centerpunched the hole locations and then drilled - leave the stainless plate protective film in place when you do this!
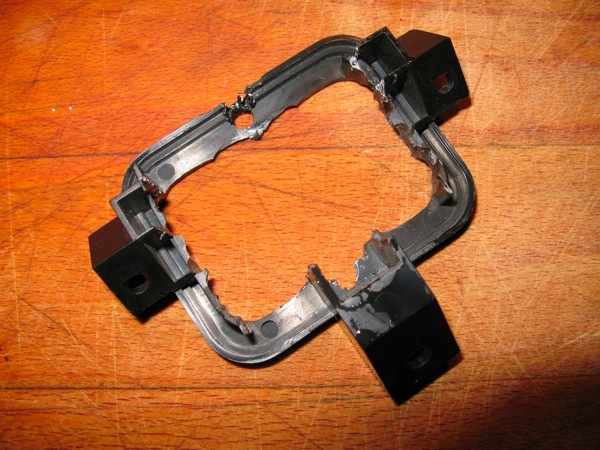
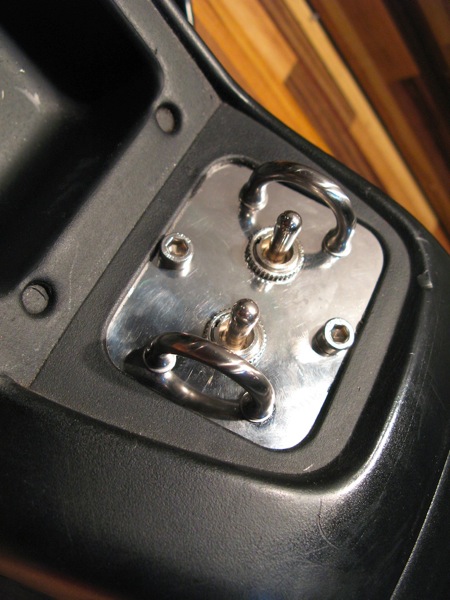
Once I was happy with the result, I test fitted the components to it like this:
The two caphead bolts go through the plastic of the original bracket. I flattened the plastic so the nuts could sit properly using a soldering iron to melt the plastic.
Once happy I took everything off and gave the plate a polish with a Dremel and some Autosol polish.
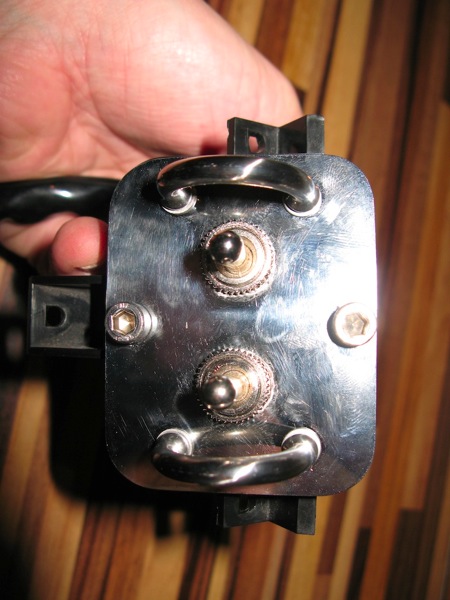
A test fit looks like this. All looking good so far. Now for the tricky part - the wiring!
Wiring the switches
I'm not an electrican at all, so I found this a bit of a challenge. I found an excellent and very helpful post on ClubRoadster.net by Jnshk here;
http://clubroadster.net/vb_forum/showpost.php?p=186671&postcount=16
but at least on my '94 Roadster the wiring colours didn't match. I worked it through and made some changes to fit my car.
I've posted the resulting wiring instructions here:
https://docs.google.com/document/pub?id=1Ba3QZ7heM6Rtsv_Hzn70WXOz6VCueFLc1FTeo32vxKg
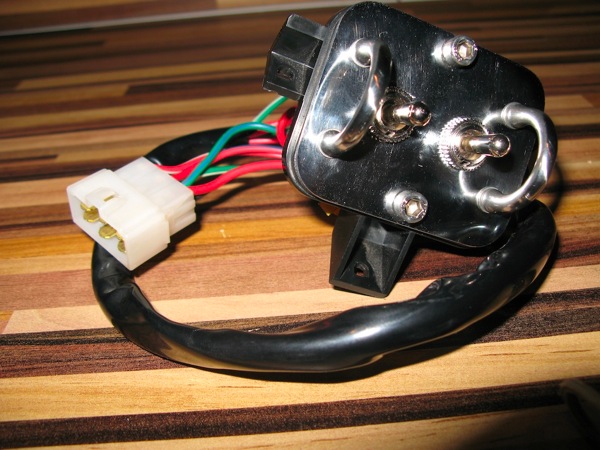
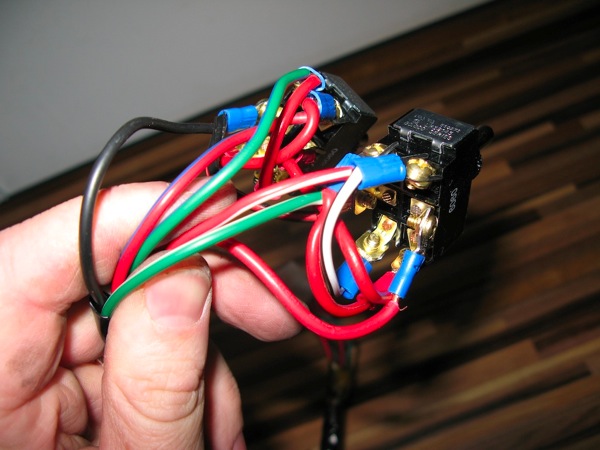
Once you've wired this up as per the instructions you'll end up with something like this:
As I was butchering a spare electric window switch to reuse the wiring and 6 pin connector, I ended up with this plug-and-play replacement for standard - note cut plastic bracket is attached:
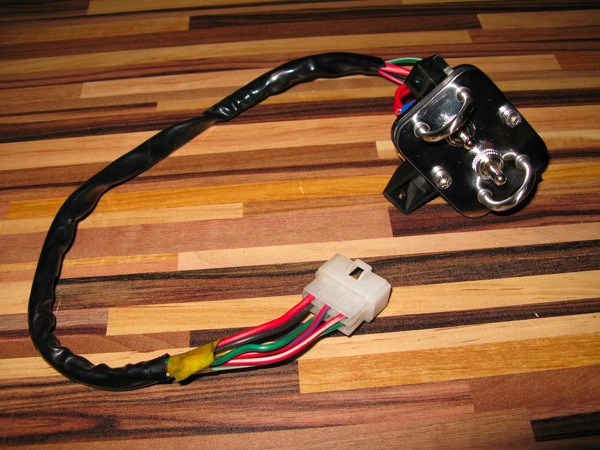
If you don't have a spare window switch to play with you'll be pleased to know that the connector on the car side has spade terminals that are exactly the same size as normal male spade connectors, so you can just attach your new switch direct to these using female spade connectors. I recommend you do a trial plug in of your new switches now, turn on the ignition and check the windows operate correctly. You realise you'll lose the one-shot up/down on the driver's side? Good, thought so.
Assuming it works correctly, take it out of the car and we'll attach it to the center console.
Turn your original center console over and remove the three screws that hold the OEM switches in place and remove. Fit the new retro switches in place and secure using the same 3 screws. The new stainless plate will be sandwiched between the bracket it's bolted to, and the plastic center console, holding it firmly in place.
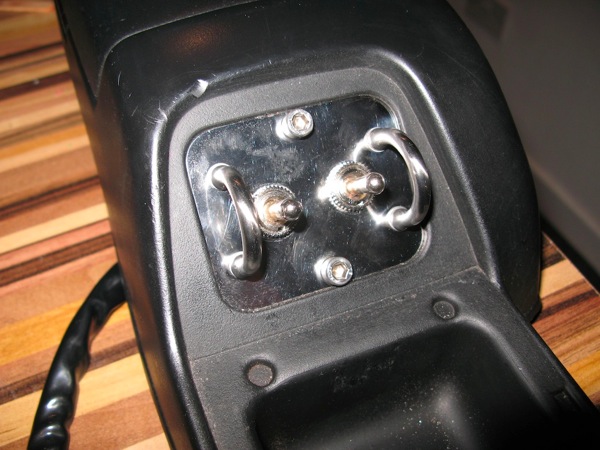
Refit the center console, and check it operates correctly. It should look something like this:
Job done!
I'm happy to help with questions on this project - and no, currently I'm not planning on doing these to order!
What you put in, you'll get back ten fold
Retro window switches
-
- New
- Posts: 10
- Joined: Tue Dec 13, 2011 10:50 pm
Retro window switches
Postby landwomble » Mon Jul 08, 2013 3:59 pm
Jump to
- The Board Room (Administration)
- Mazdamenders.net donation button
- Contact Us
- The Reception (General)
- Welcome desk
- Rules & Regs
- Forum How Tos
- MazdaMenders Shop...of all things great
- Promotions and special offers
- The technical Help desk
- Problems
- The Show Room
- Members Mx-5/ Roadsters
- The Waiting Room
- Mx/Roadster Chat and Banter
- ARCHIVE:- Mx/Roadster Chat and banter
- Non Mx/roadster general car topics
- ARCHIVE:- General car topics
- General chat and banter
- ARCHIVE:-General chat & banter
- Birthdays and general well wishes section
- Chuckle Box
- RANT! Not for the faint hearted!!!
- ARCHIVE:- Rant topics
- FaceBook links
- The Information pin board
- Mazdamenders.net Tech days
- Events & meets
- ARCHIVE:Event topics
- Games & competitions
- Site News
- Our aim and goals....
- Mazda Recalls/call backs/warnings
- The Service Department (Hands On)
- Maintenance
- MK1 -1989 > 1997 (NA)
- MK2/2.5 - 1998 > 2000/ 2001 > 2005 (NB)
- MK 3/3.5 2006 > 2015 (NC)
- Mk 4, 2015 to date (ND)
- Auto's ....all marks 1989 to date
- Modifications
- MK1
- MK2
- MK3
- Auto's
- Your mods
- recommended tools/ must haves/bargains
- The Body Shop Department
- Deepcar Autobodies..... sheffield
- General Body shop
- Cleaning & Detailing
- The Tuning & Boosting Department
- Rolling Road (Extra boost, POWER )
- Superchargers
- Turbo chargers
- Mazdamenders you tube channel
- Mazdamenders you tube channel..
- You tube tech/guide vid links
- You tube racing Vid links
- You tube car stuff vid links
- You tube funny/stupid/miscellaneous vid links
- The Workshop servicing manuals (How To's & FAQs)
- MK 1 1989 to 1997 ( NA)
- Interior
- ICE(audio) and electrics
- Audio(Head units) and speakers
- Electrics
- Trim
- Exterior
- Engine....1.6/1.8 SNC/LNC, transmission and electrics
- Engine
- Transmission and drive train
- Electrics
- Exhaust
- Clutch
- Handling,steering, suspension, wheels,Tyres
- suspension
- steering
- Wheels and tyres
- Braking
- Soft top/Hard top/windows
- Lights and eletrics
- Body panels and accessories
- Maintainence/servicable items
- Heating and cooling
- Mk 2/2.5 1998 to 2005 (NB)
- Interior
- Audio(Head units) and speakers
- Trim
- Electrics
- Exterior
- Engine....1.6/1.8 ,transmission and electrics
- Engine
- Transmission and drivetrain
- Electrics
- Clutch
- Handling,Steering,Suspension,Wheels,Tyres
- Suspension
- Steering
- Wheels and Tyres
- Braking
- Soft top/ Hard top/windows
- Lights and Electrics
- Body panels and accessories
- Maintainence/servicable items
- Heating and cooling
- MK 3/3.5 2006 to 2015 (NC)
- Interior
- Audio(Head units), speakers and Electrics
- Audo and speakers
- Electrics
- Trim
- Exterior
- Engine 1.8/2.0, Transmission and Electrics
- Engine
- Transmission and drivetrain
- Electrics
- Handling, Steering,Suspension,Wheels,Tyres
- Suspension
- Steering
- Wheels and Tyres
- Braking
- Soft top/Hard top
- Lights and Electrics
- Body panels and accessories
- Maintainence/servicable items
- Heating and cooling
- Mk 4, 2015 to date (ND)
- Miscellaneous (NA/NB/NC/ND)
- Identifying the differences between the most common parts.
- Catastrophic Chris's Poorly Mx-5/Roadster problems
- Top Tips
- NA,NB,NC,ND specs and versions 1989 to date
- JDM NA,NB,NC,ND specs/versions 1989> to date
- JDM MK 1 NA Eunos Roadster Specs 1989 > 1997
- JDM Mk 2 NB Roadster specs 1998 > 2000/01
- JDM Mk2.5 NBFL Roadster specs 2001 > 2005
- JDM MK 3/3.5/ 3.75 NC specs 2006 > 2015
- JDM MK 4 ND specs 2016 to date
- UK Mx-5 NA,NB,NC,ND specs/versions 1990 to date
- UK Mx-5 Mk 1 NA specs 1990 > 1997
- UK Mx-5 MK 2 NB specs 1998 > 2000/01
- UK Mx-5 Mk 2.5 NBFL Specs 2001 > 2005
- UK Mx-5 Mk 3/3.5/3.75 NC specs 2006 . 2015
- UK Mx-5 Mk 4 ND specs 2016 to date
- U.S Miata NA,NB,NC,ND specs/versions to date
- U.S Miata Mk 1 NA specs 1998 > 1997
- U.S Miata MK 2 NB specs 1998 > 2000/01
- U.S Miata MK2.5 NBFL specs 2001 > 2005
- U.S Miata MK 3/3.5/3.75 specs 2006 > 20015
- U.S Miata MK 4 ND specs 2016 to date
- Miscellaneous (NA/NB/NC/ND) brochures form around the world
- Test driving
- Track / Racing
- ARCHIVE:- Track / Racing
- Accessory Catalogues
- Jass performance
- Matthews accessory corner
- Mx5 Tech
- Mx5.fixes.com
- Binarypunk mods & products
- Mazda Bongo
- Miscellaneous Co's of interest
- Traders Section
- Autolink
- Goodwood Sports Cars
- Stokes of kelsey
- Furious fives
- Classifieds
- Auto jumble
- Items For Sale
- Mazda Menders bat cave clear out
- Wanted
- The forecourt (Mx-5/roadsters)
- The swap shop
- Parts Department
- Autolink specials.........
- Insurance
- Adrian Flux Insurance
- The Toilets
- Sin Bin
- Stupid questions and threads archive
- The spotted threads
- The Breakdown help desk
- Mazda-Menders Mx-5 5th Emergency service Volunteers for Mx/roadster owners,,,,
- Feedback Box
- Your Suggestions
- ARCHIVE:-Suggestions
- Complaints Department (Site Problems)
- ARCHIVE:-Site problems
Who is online
Users browsing this forum: No registered users and 1 guest