What you put in, you'll get back ten fold
***** THIS IS VERY IMPORTANT TO THE SITE AND HELPING YOU,OTHERWISE IT CLOSES AND ALL THIS ON LINE GARAGE IS GONE FOR GOOD*****

Greetings and welcome to menders, this site was built for every owner that might need her to help keep those bills low and also keep them on the road where they belong, she is run by very passionate enthusiasts owners for passionate enthusiastic owners, see her like a on line garage, there is a lot of tech stuff hopefully explained for everyone to use, if there is something you cannot get your head around, or you feel that there is a strong walk through guide missing that needs creating by one of us or from yourselves, please let us know, we are also on false book and youtube, which as short tech vids to help, and again if you feel there is a vid that would help please get it touch.
the menders is free, but like everything there is a cost to run things and bills( we are just happy its not a heating cost), so if we have saved you hundreds, please throw a small donation in the pot so we can keep on going to carry on helping others in the same way .

*** we are currently looking for a sponsor for this year, so if you have the passion and can see this sites worth to everyone , please get in touch and step forward to help***

And thank heavens that we are now on the way back up the brighter ,warmer longer days, "come on summer", and lets see those project builds.


M-m

Headlamp Retractor Switch (Strip down and Repair)

User avatar
Tony Rama
Just Run In
Posts: 29
Joined: Sat Apr 26, 2014 6:52 pm
Location: Croxley Green

Headlamp Retractor Switch (Strip down and Repair)

Postby Tony Rama » Mon May 05, 2014 12:34 pm

Remove the switch by first removing the gear lever console and then the heater/ICE console, to which it is secured from the back by 2 screws. (there are guides to removing the heater/ICE console elsewhere).

Once the switch is out, place it on a clean surface with plenty of light. First remove the 2 light bulbs by turning them 1/4 turn anti clockwise. A blob of blue-tak on the end of a screwdriver may be needed to lift them out. If these are not removed before dis-assembleing the switch they will drag the entire innards out with them dispersing many of the 21 parts (including 6 coil springs) over a 4 foot radius! Been there!!
Image

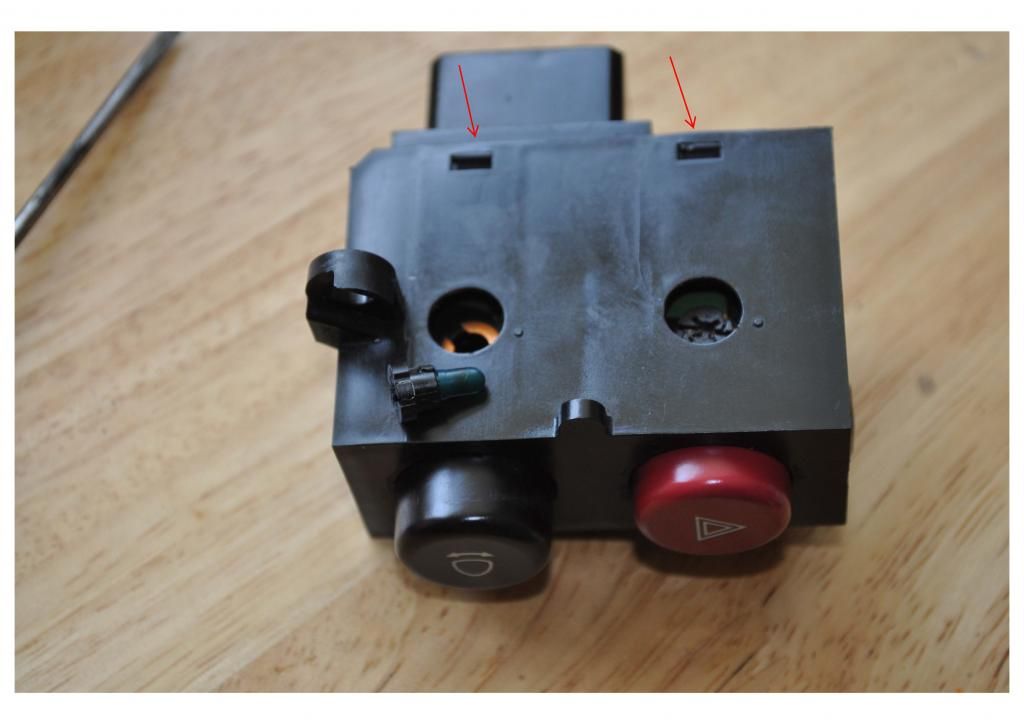
Next prise the plug/contact unit from the back of the switch by inserting a knife or small screwdriver behind the 2 retaining lugs indicated. Turn over and repeat for the other side. ONLY separate by 1mm until the next step.
Image

Withdraw the plug/contact unit from the button housing while holding the switch position pads in place. This stops the button units from sudden dis-assembly. The contacts are now accessible for cleaning and re-greasing with some petroleum jelly. The group of 4 contacts are for the retractor switch. The contacts look well made and are unlikely to fail. Image

Next withdraw the plug housing from the contact board.
Image

Turn the unit over to expose the circuit board. This is where mine had failed. There was a dry joint (indicated by the arrow). A dry joint is where there is an annular crack in the solder when the joint was made, either by the use of insufficient flux, or movement of the components before the solder had set. At first there is no problem because there is metal to metal contact, but over time, oxidisation takes place and this gradually reduces the electrical connection to zero. Re-solder any or all dodgy looking joints. In my opinion this is the weakest part of this switch unit, and others including relays which also have circuit boards. I just fixed a flasher unit on a Daf truck with a similar fault.
Image

Replace the circuit board into the plug cover.
Image

To gain access to the other contacts, remove the springs...
Image

...then gently pull out the button units with the switch position pads. Image

Note the location of the spring and position pin.
Image

Now turn over the button units and position pads to expose the contacts at "A" and the tracks at "B". Clean and lubricate both with petroleum jelly.
Image

The button unit can be further dis-assembled by pulling the contacts up and out. Their spring will then come out.
Image

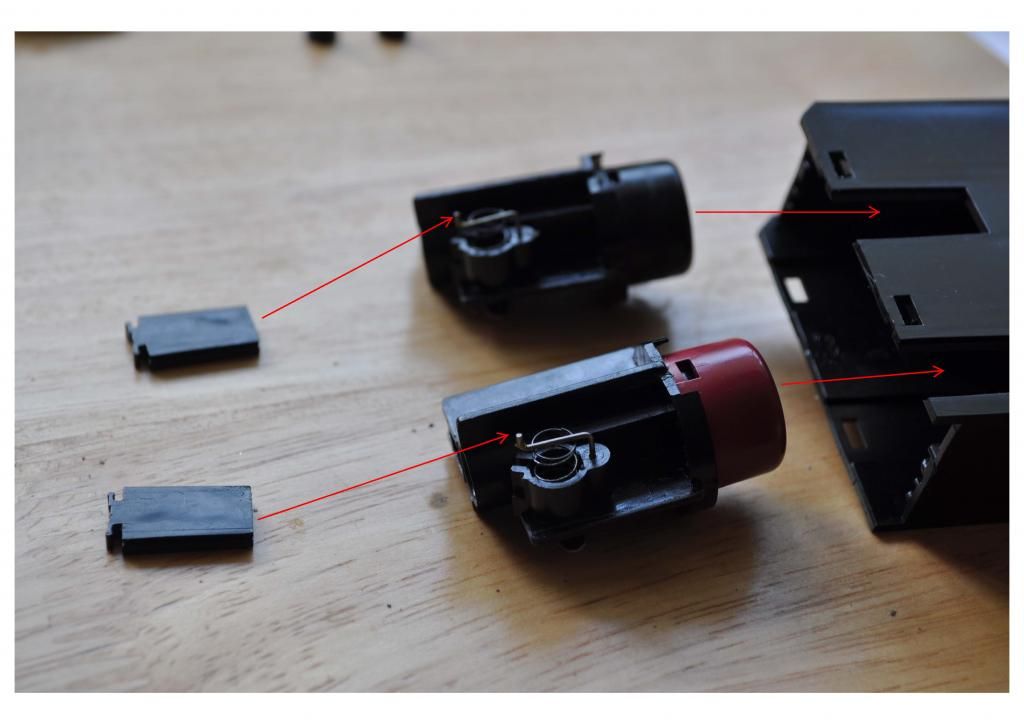
To re-assemble, place contacts and spring in button unit. Turn over button units and position pads and check all springs and pins are in place. Locate position pads over pins on button unit and gently slide into button housing. This is a little fiddly but after a couple of attempts I managed it.
Image

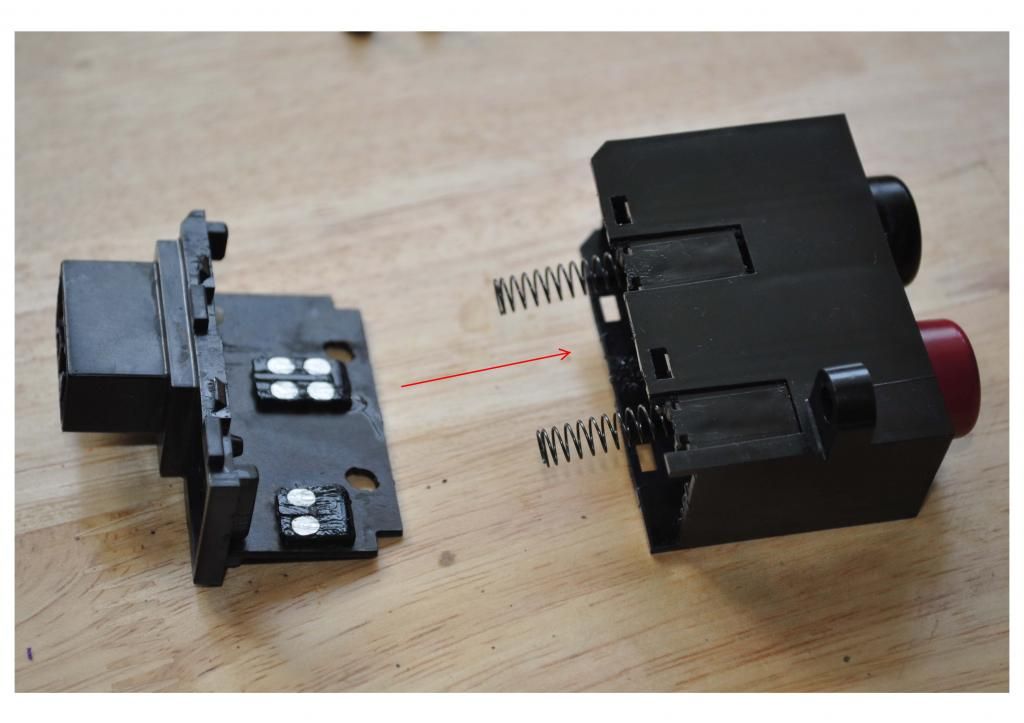
Next locate the big springs in the button housing and gently slide the plug/contact unit into the button housing making sure that the springs sit on their locating tabs on the plug/contact unit. Snap the plug unit to the button housing and thats it! GOOD LUCK!
Image
1995 NA 1.8 EUNOS G-LTD
User avatar
Mazda Mender
Site Admin
Posts: 15089
Joined: Tue Dec 06, 2011 6:18 pm
Location: Pie land, in the glen of Wiganshire
Contact:

Re: Headlamp Retractor Switch (Strip down and Repair)

Postby Mazda Mender » Mon May 05, 2014 8:42 pm

:clap: :clap: :clap: :handgestures-thumbup: :bow-yellow: :coffee:
M-m
The Disclaimer:-
This post is a natural product made from recycled electrons. The slight variations in spelling and grammar enhance its individual character and beauty and in no way are to be considered flaws or defects, the articles/answers/comments are provided for information purposes and they are not intended to substitute informed professional advice, I or mazdamenders.net cannot personally be hold responsible for any damage occurred from following this procedure or any injuries from it. Proceed at your own risk.


Mk 1 Eunos 93 black V.S II 1.8 ,
Mk 2 .1/4 Roadster 99 black & gold V.S 1.8 .
Mk 1 Eunos 90 1.6 soul red ..f/ build
MK 2.1/4 Blue V.S Roadster 1.8 99 ..
MK1 1.8 ,white import.. (Ashleighs)
MK1 1.6 yellow J ltd import.f/build
MK 1 1.8 black Tokyo Ltd..f/build


http://www.mx5oc.co.uk/ http://www.mx5nutz.com/forum/ http://miata.net/ http://www.autolinkuk.co.uk/
User avatar
flea
Moderator Wannabe
Posts: 6618
Joined: Wed Dec 07, 2011 8:42 pm
Location: Medway towns, Kent

Re: Headlamp Retractor Switch (Strip down and Repair)

Postby flea » Mon May 05, 2014 8:46 pm

Brill Tony. Great write up & loads of pictures
Eunos 1.6 special 1989 with a few added extras
Eunos 1991 1.6
Eunos 1990 1.6 project
Mk2 1999 1.8

Return to “MK1 -1989 > 1997 (NA)”

Who is online

Users browsing this forum: No registered users and 6 guests