Page 2 of 3

Re: Creepys new Black-un

Posted: Thu Jan 14, 2016 7:23 pm
by Creepy
Mazda Mender wrote:
Creepy wrote:Whilst I can't guarantee it's effectiveness in the rain (my motor is still in the garage whilst I complete the interior) it's really easy to apply to the door. You can cut lengths with a pair of scissors or sharp blade - just don't leave any gaps obviously. My polythene membrane is now stuck fast and I'll be surprised if it ever comes off again. It's certainly looks to have sealed extremely well. If I get chance at the weekend I'll take a photo and post it here.


So is this a solid fix? or not far off how the OE stuff works ? as in it can still be pulled apart for any repairs IE- door lock/springs,window mechs etc that maybe needed with in the doors.
M-m


Its essentially the same stuff as the OE but just in a strip AFAIK. The polythene membrane will pull off I reckon but with care. Not sure I want to test it just yet as it all looks so neat at the moment. I'll be miffed it I make a mess of it. I'll try with a test piece at the weekend and see how I get on - watch this space.

Re: Creepys new Black-un

Posted: Thu Jan 14, 2016 7:59 pm
by Creepy
A couple of other odd jobs I've been doing...

A) The instrument cluster cowl had a few marks and scratch's so that's been tidied-up. Thanks to Ric/Landwomble for the advice to use Plasti-coat matt black spray. This really works a treat and the cowl is as good as new (I used a little knifing putty to fill a couple of scratches and a VERY light wet-dry sand once dry.

Also did the same for the Tombstone. Looks like new again.

WP_20160113_23_37_24_Pro.jpg
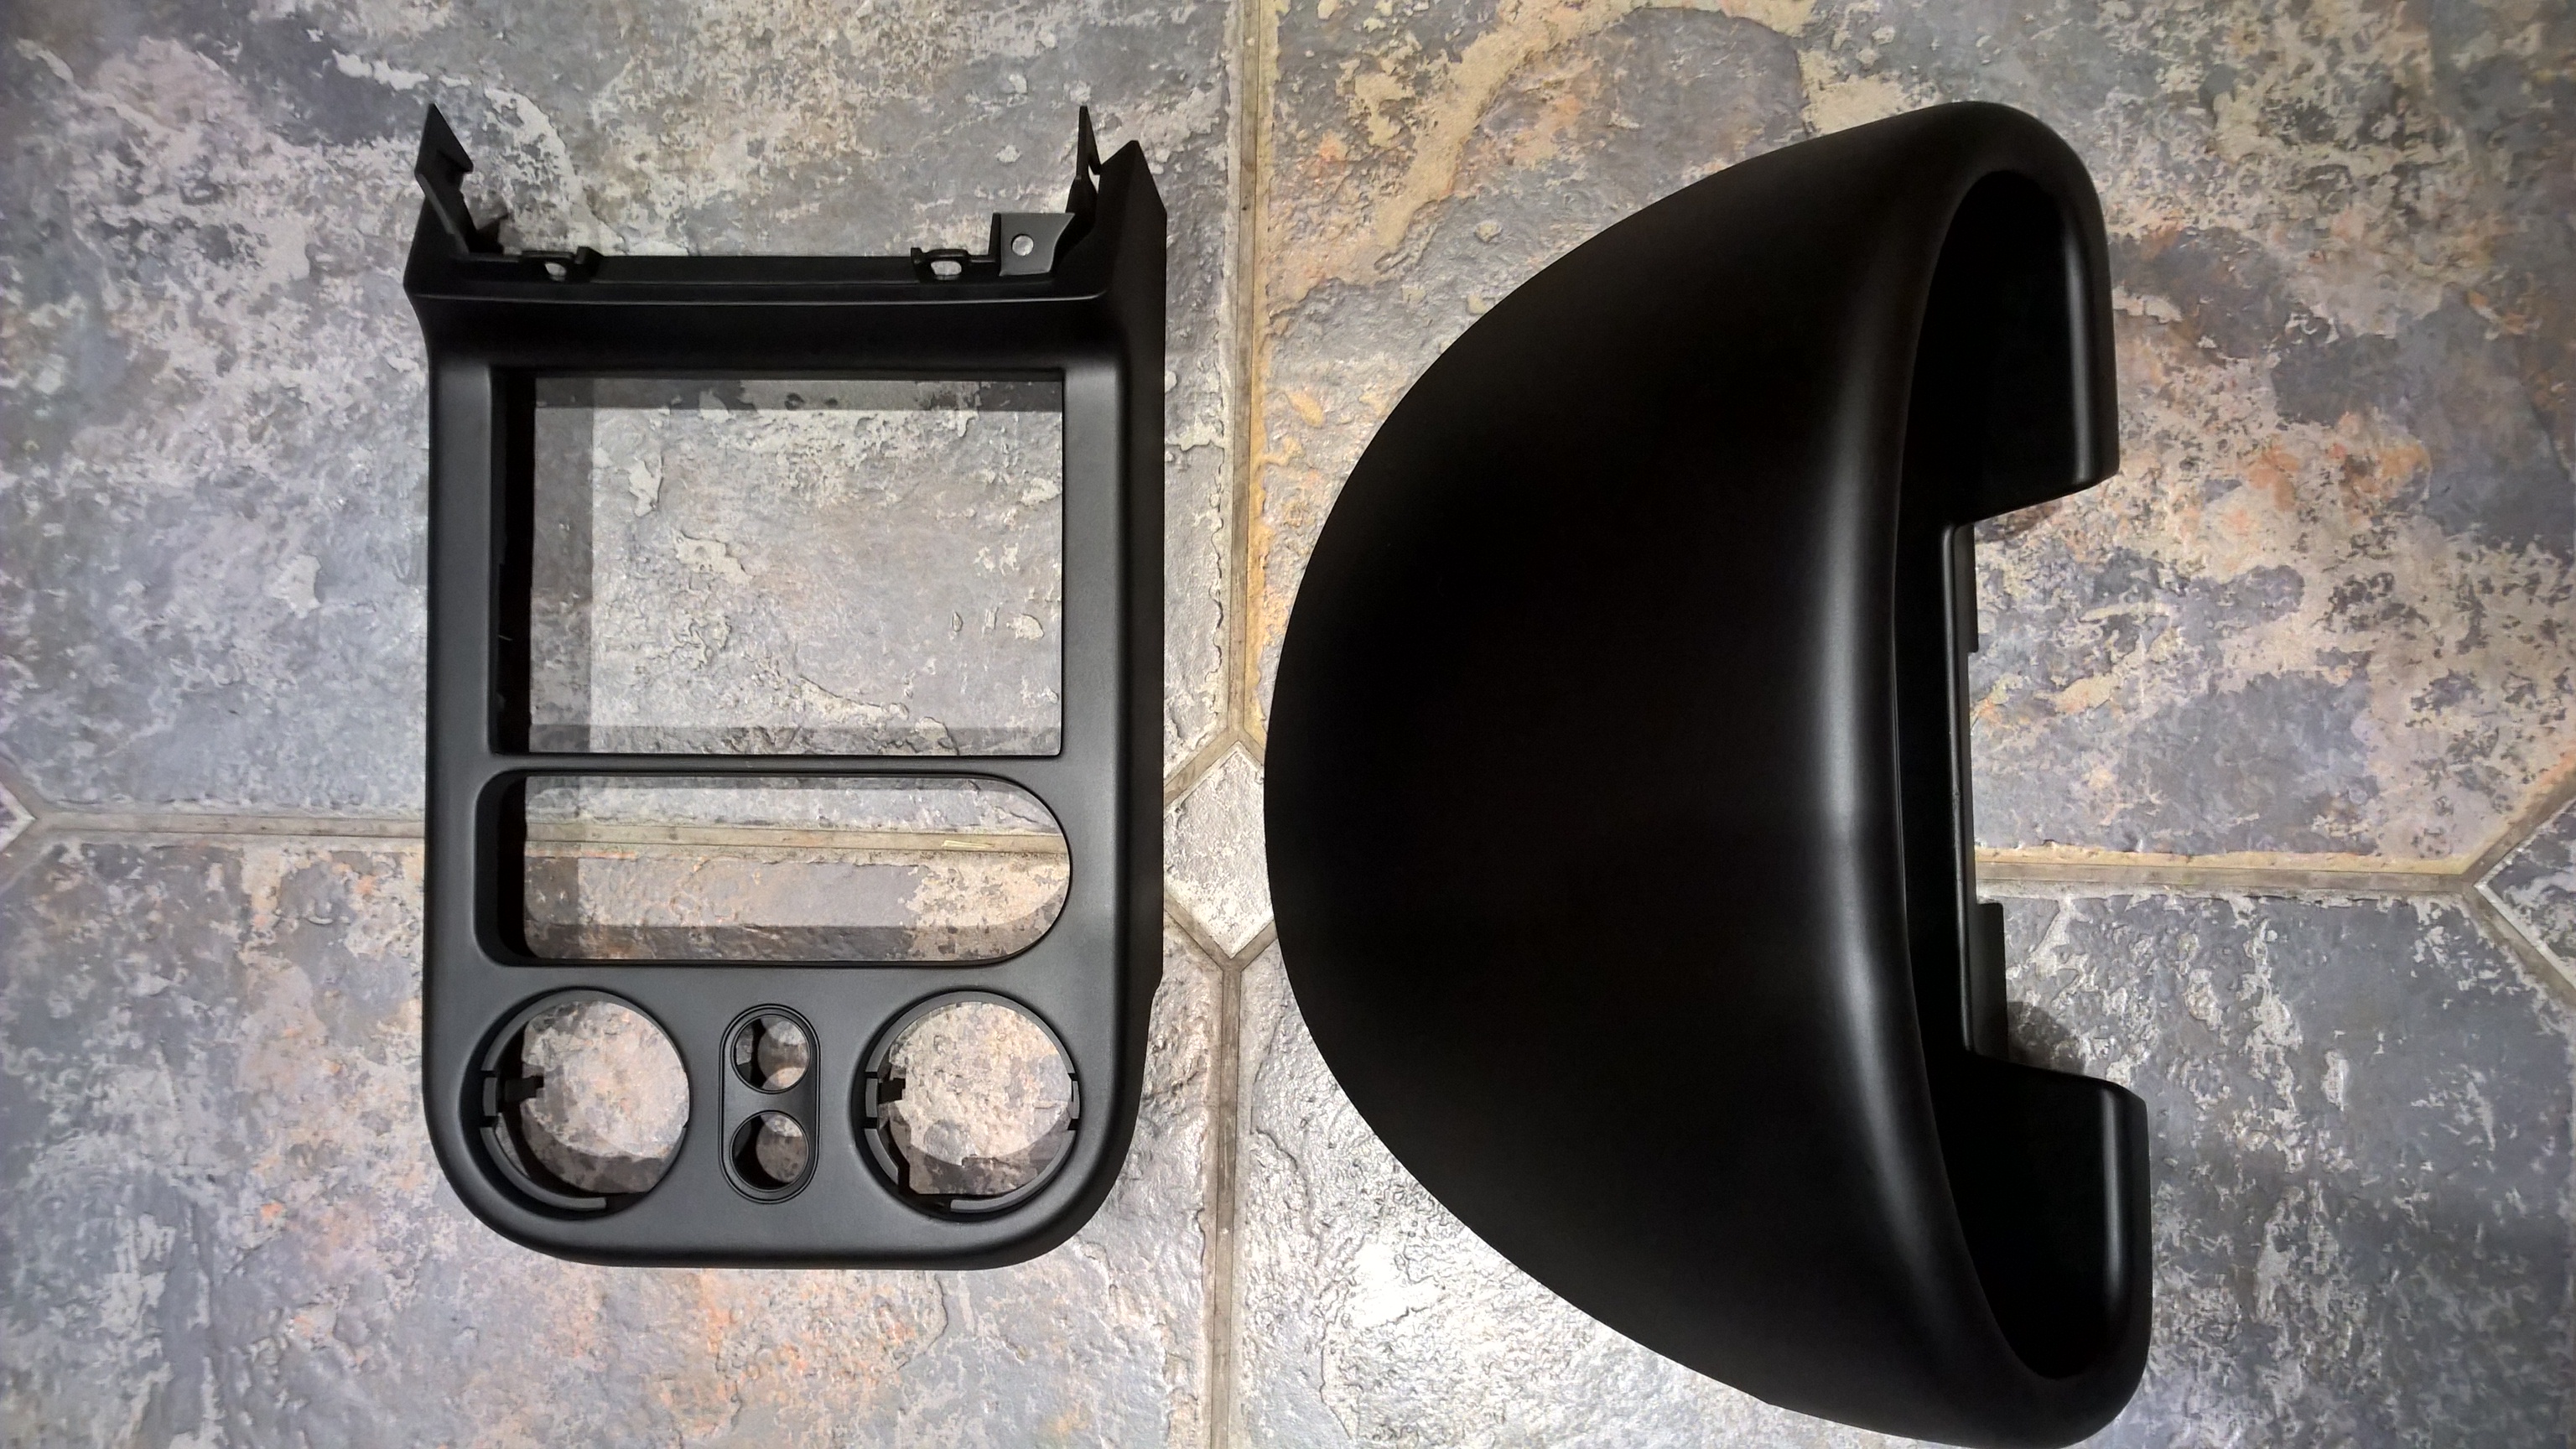
Instrument cowl and tombstone post plasti-coat
WP_20160113_23_37_24_Pro.jpg (1.71 MiB) Viewed 12034 times


B) Also fitting new bolts and springs to door mirrors ( I folded one of the mirrors whilst it was working in the garage and it came off in my hand...decided to do both at the same time to be safe!) Apparently its a known problem and the steel bolts simply rust over time. Thanks to Andrew at Autolink for the new stainless set. Great service and support as always!

WP_20160113_23_38_53_Pro.jpg
Wing mirrors with new stainless nut and bolt.
WP_20160113_23_38_53_Pro.jpg (1.89 MiB) Viewed 12034 times


Interesting how one of the mirrors is green inside. I guess it was a re-sprayed at some point :-)

QUESTION: Have I fitted these the correct way-up (with the nylon-nut in the actual door mirror? Fitting the other way round seemed to leave to much of the bolt sticking down and may affect judgement. Aldo should I grease the ball joint, maybe with a little silicone lube? Just to keep them moveable but still tight?

C) Installed the very useful warning light kit from BinaryPunk. Removing the Perspex glass was a real pain. Luckily I got a couple of tips form forums and Landwomble so got there in the end (with one tiny crack which won't be seen). Also fitted chrome rings to the 3 small instruments. I've decided to leave the rest "as-is" and MAYBE install new faces as some point in the future. Truth be known, I quite lack the standard face anyway and the chrome rings finish it off nicely.

WP_20160113_23_41_20_Pro.jpg
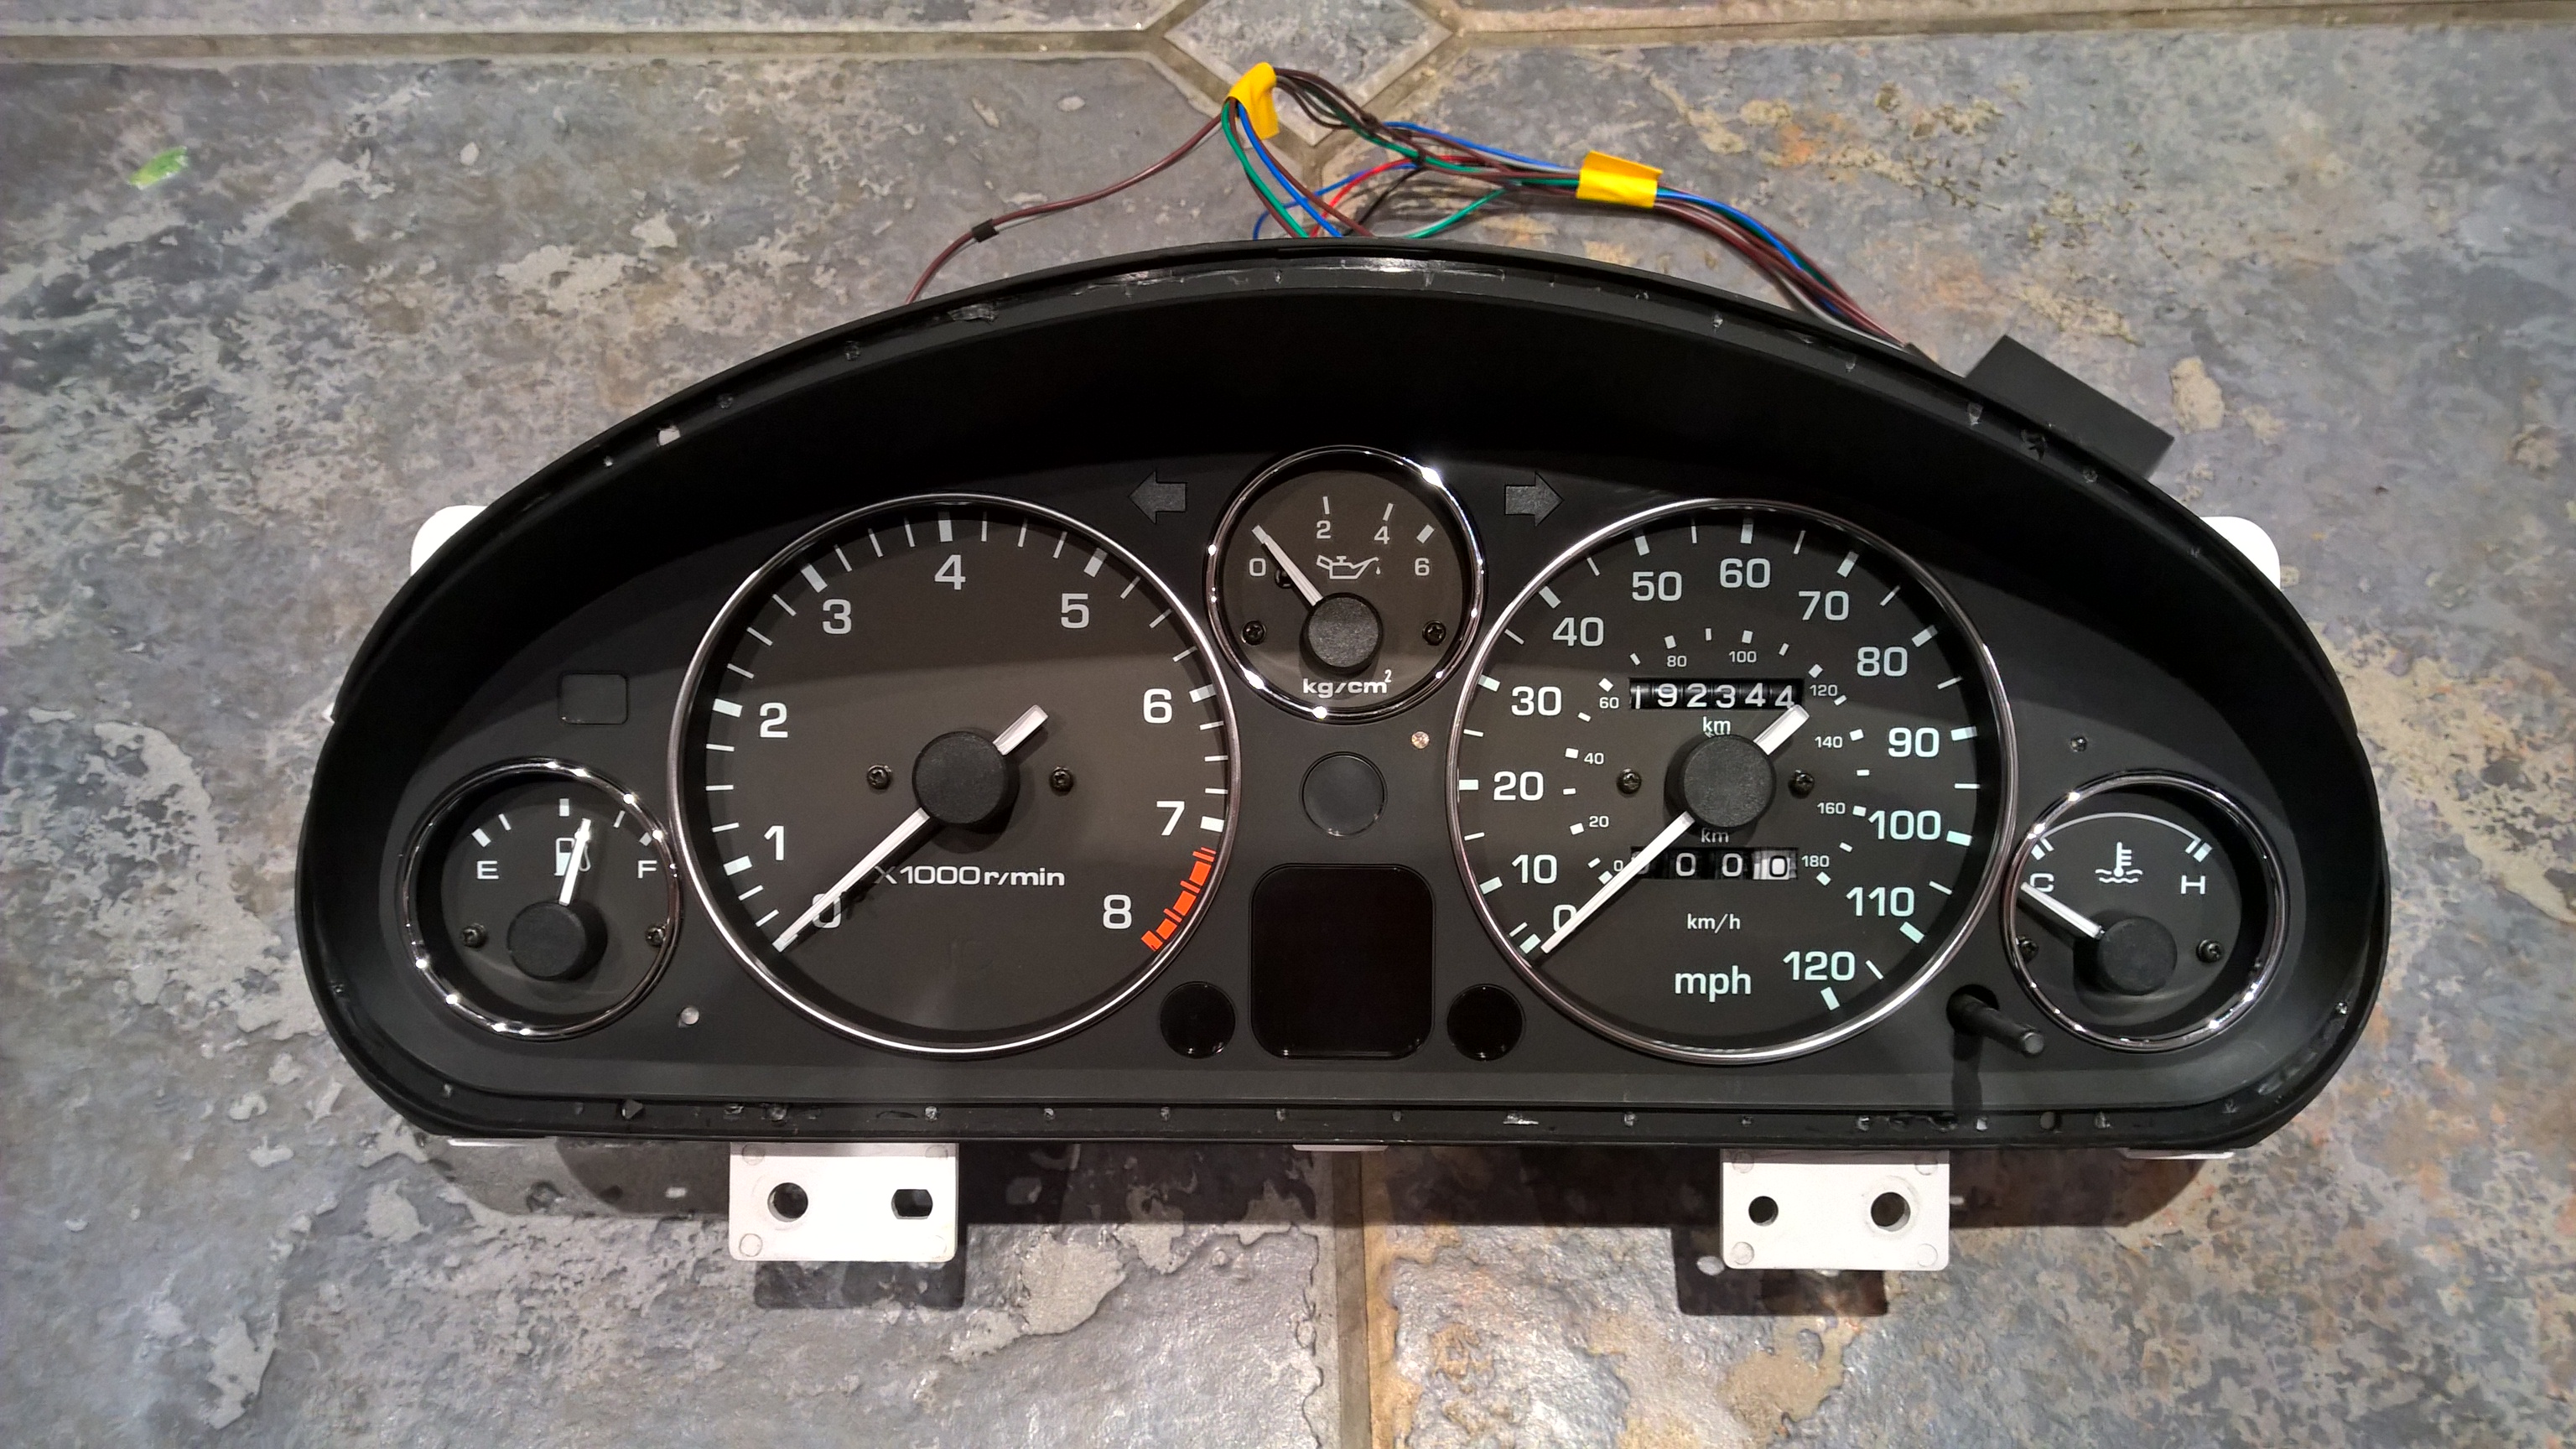
BinaryPunks warning light kit fitted (3 leds)
WP_20160113_23_41_20_Pro.jpg (1.63 MiB) Viewed 12034 times


WP_20160113_23_41_49_Pro.jpg
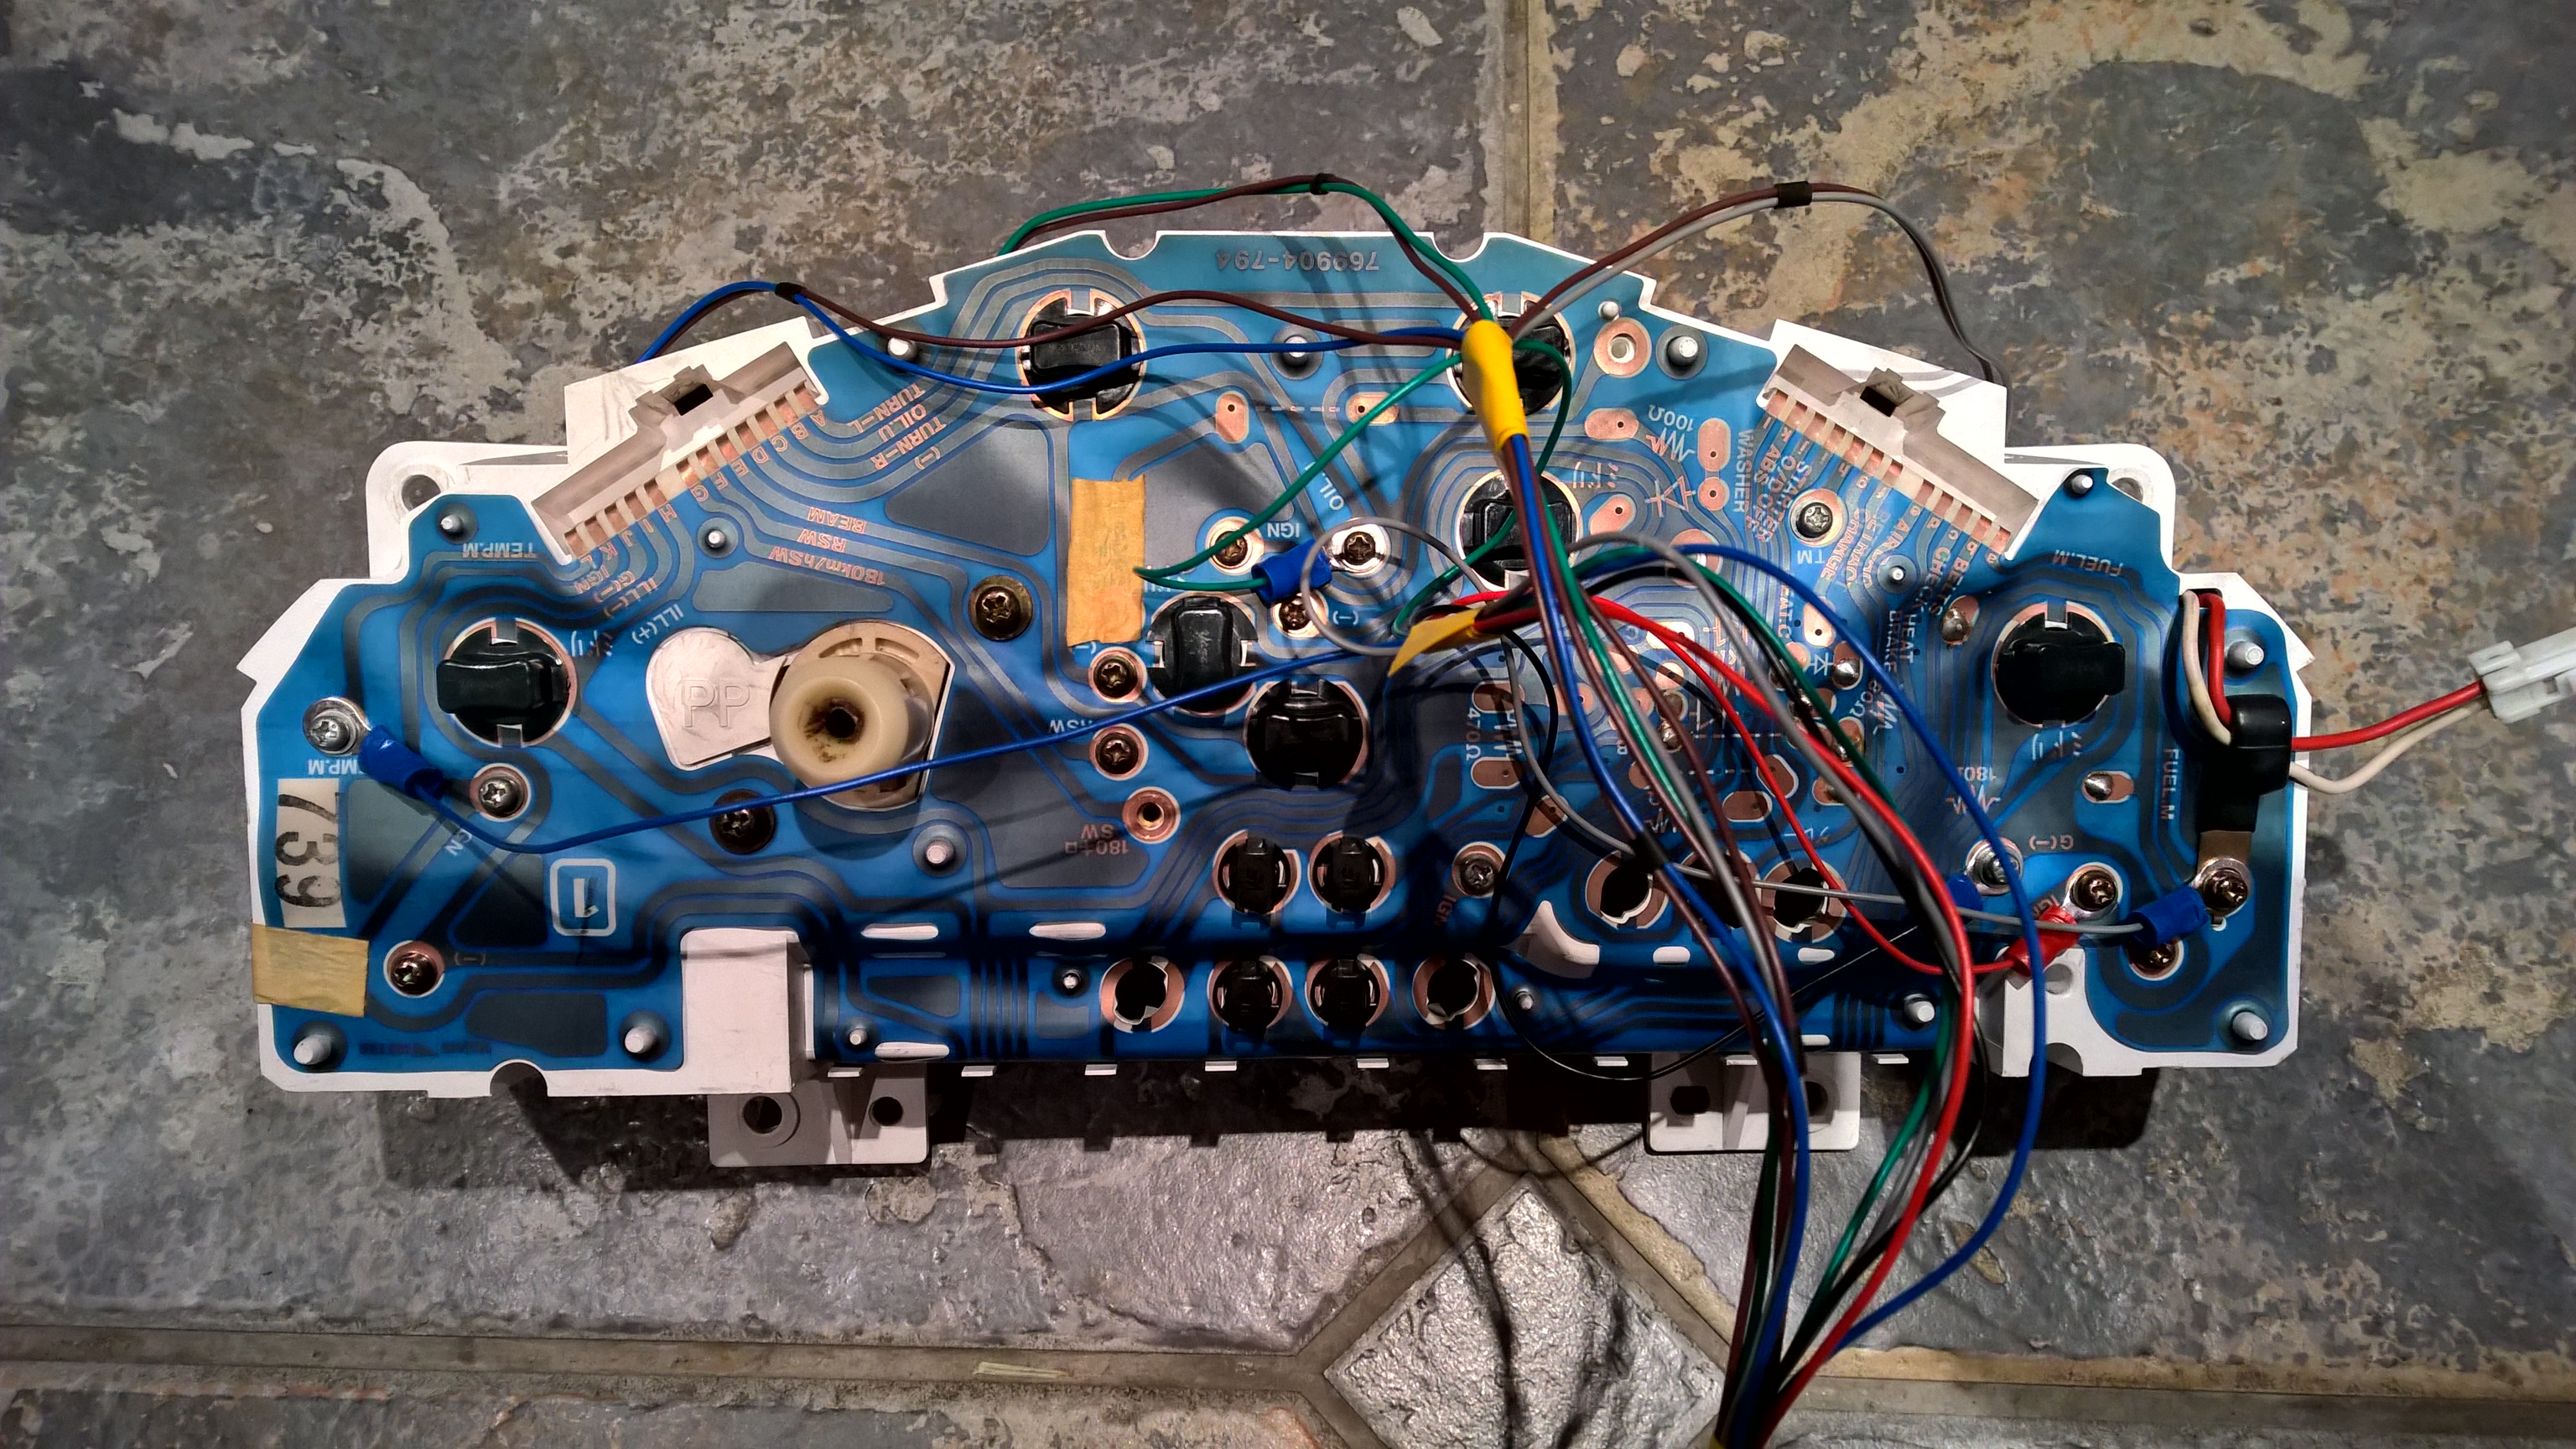
Wiring connections for BinaryPunks warning light kit
WP_20160113_23_41_49_Pro.jpg (1.99 MiB) Viewed 12034 times


I was also advised I could remove the rev-limiter screw (SW) that was fitted to the Eunos edition - apparently its perfectly fine and not fitted to UK version anyway? Happy to take advice on this :-)


QUESTION: Is there anywhere you can purchase JUST the Perspex glass. Aside from the small crack (which won't be seen) there are a load of very light spots/stains on the Perspex - almost as though a coke can has sprayed on it sometime long ago. I can't for the life of me remove the marks and I don't dare use anything abrasive for obvious reasons. It's not worth me getting a whole new cluster, even second hand, but I would shell out for a new Perspex glass if there were available?

All thoughts and feedback very welcome.

Next post...dashboard removal

Re: Creepys new Black-un

Posted: Mon May 30, 2016 10:28 pm
by Creepy
Seems like months since my last post but I've been keeping myself busy looking after the black-un and making a few mods/additions.

A while ago I decided to replace the dashboard which had a crack where the centre bolt is located (I hear this isn't an uncommon fault?) . Ordered a replacement from Autolink which arrived promptly and in very good condition. Essentially perfect aside from requiring a good clean and make over. Credit to Andrew at Autolink as the packaging, delivery and overall service/support was superb.

WP_20160101_10_19_50_Pro.jpg
Replacement dashboard cleaned and smartened
WP_20160101_10_19_50_Pro.jpg (1.4 MiB) Viewed 11366 times


While the dashboard was out I also decided to give the Heater unit/Exchanger a good clean. I doubt I'll be removing the dashboard again in a hurry - so it seemed like a good opportunity. The unit was pretty filthy to be honest but I guess that's to be expected after 20 years of service. After draining the coolant and removing the unit I separated the two half's to reveal the matrix. Needless to say it contained a significant amount of muck and sludge. Interestingly the foam covering the baffles/air directors was completely shot and simply turned to powder when touched so I decided to renovate. I purchased some good quality foam and spray adhesive and simply cut new pieces to shape and stuck them onto the air directors. All-in-all a thoroughly enjoyable project and I was really chuffed with the end result. (I did the same on the blower unit air director too).


WP_20160116_13_27_30_Pro.jpg
Heater Unit in two half's with replaced foam baffles/air directors
WP_20160116_13_27_30_Pro.jpg (1.4 MiB) Viewed 11366 times


WP_20160207_15_15_23_Pro.jpg
Renovated heater unit back in situ, also air blower with replacement foam baffles
WP_20160207_15_15_23_Pro.jpg (1.56 MiB) Viewed 11366 times

Re: Creepys new Black-un

Posted: Mon May 30, 2016 11:05 pm
by Creepy
Decided to remove the carpet whilst I had the dashboard and heat exchanger out (and obviously, seats, centre console, tombstone, etc were all removed too). Good news is that the floor pan is in great condition and no signs significant rust or problems.

WP_20151230_15_02_32_Pro.jpg
Floor pan of the black-un, just after carpet removed
WP_20151230_15_02_32_Pro.jpg (1.54 MiB) Viewed 11364 times


Gave the floor a through clean and laid some sound deadening material to replace the original matting which was badly worn and smelly... (note the new wiring in place for the heater seats. headrest speakers, etc)

WP_20160131_18_14_09_Pro.jpg
Black-un floor pan with sound deadening
WP_20160131_18_14_09_Pro.jpg (1.33 MiB) Viewed 11364 times


Managed to borrow a carpet cleaner off an old friend and spent a good few hours scrubbing and cleaning. Really impressed with the end result and aside from a few old cigarette burns the carpet looks as good as new.


WP_20160207_14_01_39_Pro.jpg
Cleaned carpet 1
WP_20160207_14_01_39_Pro.jpg (1.53 MiB) Viewed 11364 times


WP_20160207_14_01_43_Pro.jpg
Cleaned carpet 2
WP_20160207_14_01_43_Pro.jpg (1.79 MiB) Viewed 11364 times

Re: Creepys new Black-un

Posted: Tue May 31, 2016 8:00 am
by flea
Great

Re: Creepys new Black-un

Posted: Tue May 31, 2016 12:13 pm
by Mazda Mender
Get in there.
M-m

Re: Creepys new Black-un

Posted: Wed Jun 29, 2016 1:21 pm
by Creepy
Added some new alloys a few weeks ago - Rota RBs. Look lovely but wondering if I should lower the suspension a tad? Hmmmmm.


WP_20160530_20_04_24_Pro.jpg
Rota RBs
WP_20160530_20_04_24_Pro.jpg (6.02 MiB) Viewed 10241 times


WP_20160530_20_04_40_Pro.jpg
Rota RBs 2
WP_20160530_20_04_40_Pro.jpg (6.04 MiB) Viewed 10241 times

Re: Creepys new Black-un

Posted: Wed Jun 29, 2016 2:09 pm
by 71notout
Creepy wrote:Added some new alloys a few weeks ago - Rota RBs. Look lovely but wondering if I should lower the suspension a tad? Hmmmmm.


Definitely!

Car coming on though bud :obscene-drinkingcheers:

Re: Creepys new Black-un

Posted: Wed Jun 29, 2016 10:03 pm
by blackyb
She sits like our does on Mk2 suspension, slightly elevated at the rear???

Re: Creepys new Black-un

Posted: Thu Jun 30, 2016 7:18 am
by Mazda Mender
She is on MK 1 units, they need the nuts and bolts cracking, put them under load and re tighten back up again.
M-m

Re: Creepys new Black-un

Posted: Wed Aug 10, 2016 1:55 pm
by Creepy
Mazda Mender wrote:She is on MK 1 units, they need the nuts and bolts cracking, put them under load and re tighten back up again.
M-m


Thanks Mm. Sounds like a job for the winter months :-)
I'm trying to make the best of the "summer" weather and keeping the black-un on the road for the next few weeks as much as I can.
However, definitely a job that needs to be done as it looks a lot higher than all the other MX5s I see on the road.

:text-thankyouyellow:

Re: Creepys new Black-un

Posted: Wed Aug 10, 2016 8:17 pm
by MarkEt
Maybe the other drivers are fat and carry three twelve packs in the trunk ?

Very, very impressive job.

That's why I need a garage. I got to know most of my neighbors while working on the central locking and doors, but they're going to think I'm crazy with too much time on my hands.

Re: Creepys new Black-un

Posted: Fri Jun 23, 2017 3:57 pm
by Creepy
Thought I'd post a few pics of the Black-up and how it's looking after a few more mods and tweeks and a quick re-spray.

WP_20170623_13_52_38_Pro.jpg
Black-un as of June 2017
WP_20170623_13_52_38_Pro.jpg (470.09 KiB) Viewed 9679 times


Notice the manual mirrors have been swapped for 1.8 electric door mirrors - they work really well and great for me and the good lady as we need to alter each time we swap. Wiring wasn't too hard either. I bought the mirrors and switch + Wiring loom from Andrew at Autolink. Top-chap and really helpful - defo recommend using Autolink - call them direct if you need to chat - always good intel and advice.

WP_20170623_13_49_39_Pro.jpg
Black-un View form the front as of June 2017
WP_20170623_13_49_39_Pro.jpg (397.27 KiB) Viewed 9679 times


view of the front - with new front Grill and cut down Number plate (without that ugly black plastic plinth that comes as standard). i wanted to keep the plate legal but try and show as much of the MX5 smile as possible. Also the lower air guide has been sprayed a matt black - looks really good I reckon. Need to be VERY careful on those speed bumps now!


WP_20170623_13_54_10_Pro.jpg
Black-un interior as of June 2017
WP_20170623_13_54_10_Pro.jpg (380.12 KiB) Viewed 9679 times


Interior with reconditioned steering wheel, a few bits of chrome added, leather gear knob + gaiter and a couple of new dials. You can see the heated seats switches on the tombstone too. I added these to a blanking plate which was a bit of a fiddle and still not entirely happy but it will do for now. Not sure I need heated seats, but whilst I was re-upholstering the seats it seemed sensible to throw them in too. Also a new centre console with cup holders. These are on the wrong side really - but I'm only short so the cup holder don't get in the way of my knees.

I'd welcome any thougth and recommendations on other add-ons/changes that would improve the interior.

WP_20170623_13_51_34_Pro.jpg
Black-un interior doors open as of June 2017
WP_20170623_13_51_34_Pro.jpg (442.08 KiB) Viewed 9679 times


Side view showing the re-upholstered seats and new doors cards and re-upholstered leather seats. Has Anyone fitted those chrome (plastic) interior door handle surrounds from MX5 parts? Are they any good?

WP_20170623_13_49_22_Pro.jpg
Black-in back-end as of June 2017
WP_20170623_13_49_22_Pro.jpg (458.11 KiB) Viewed 9679 times


Rear view. Nothing much changed here aside from the parking sensors. I know, I know, why the hell do you need parking sensors on an MK5???? Well actually I very nearly mashed the back end last year when I forget I was reversing onto my drive and forgot this motor didn't have sensors to bleep-bleep when I was a couple of feet from the back wall. I've grown so accustomed to my regular run-around having sensors that I frightened to death I'll prang the MX5 - hence I fitted them :-) What the hell - they don't detract too much and it was a fun project.

Not sure what to do next? I've noticed a couple of the shock absorber rubber boots are split and I STILL need to lower the car a little. Maybe this winter I'll fit some coilovers? Is it a hard job? Any advice on what to buy? I don't want anything too expensive/hard ride/race formula. Just a good quality set that I can adjust to suit?

Let me know if you have any questions.
Cheers,
Andy

Re: Creepys new Black-un

Posted: Fri Jun 23, 2017 4:04 pm
by landwomble
That looks lovely mate. You need to sort the rear ride height out and it'll be :handgestures-thumbup:

Re: Creepys new Black-un

Posted: Fri Jun 23, 2017 8:21 pm
by Speedy
The Black un is looking great, well done. She used to sit low when on Rokkor coilovers then onto MeisterR that does needs sorting pronto.

IMG_0716.JPG
IMG_0716.JPG (616.71 KiB) Viewed 9673 times