What you put in, you'll get back ten fold
***** THIS IS VERY IMPORTANT TO THE SITE AND HELPING YOU,OTHERWISE IT CLOSES AND ALL THIS ON LINE GARAGE IS GONE FOR GOOD*****

Greetings and welcome to menders, this site was built for every owner that might need her to help keep those bills low and also keep them on the road where they belong, she is run by very passionate enthusiasts owners for passionate enthusiastic owners, see her like a on line garage, there is a lot of tech stuff hopefully explained for everyone to use, if there is something you cannot get your head around, or you feel that there is a strong walk through guide missing that needs creating by one of us or from yourselves, please let us know, we are also on false book and youtube, which as short tech vids to help, and again if you feel there is a vid that would help please get it touch.
the menders is free, but like everything there is a cost to run things and bills( we are just happy its not a heating cost), so if we have saved you hundreds, please throw a small donation in the pot so we can keep on going to carry on helping others in the same way .

*** we are currently looking for a sponsor for this year, so if you have the passion and can see this sites worth to everyone , please get in touch and step forward to help***

And thank heavens that we are now on the way back up the brighter ,warmer longer days, "come on summer", and lets see those project builds.


M-m

Creepys new Black-un

A place for members to show off their pride and joy. Also room to document your projects.
User avatar
Creepy
Regular
Posts: 56
Joined: Mon Sep 28, 2015 8:49 pm
Location: South Manchester

Creepys new Black-un

Postby Creepy » Wed Oct 07, 2015 11:59 am

Well, here I go on a new and somewhat daunting venture.

My good friend (+ex owner of an MX5) convinced me everyone should own an MX5 at some point in their lives...so I took him on face value and have just taken ownership of a lovely Black Mk1 Eunos. I was introduced to the wonderful Wayne a couple of weeks ago and I'm hooked already.

Frankly, I'm somewhat out-of-my-depth at the moment and it's clearly a step learning curve. However, when i was MUCH younger I spent most of my time under the bonnet of a (proper!) Mini 850 and actually completed some pretty tough jobs (Changing a broken the gearbox selector fork was probably the most complex!) so I have some experience and knowledge of car mechanics albeit a bit rusty and in need of upgrade :-)

Anyway, I'm sure many of you will have seen this car on the forum previously....it's Speedy's previous love and joy "the black-un" as per forum post http://www.mazdamenders.net/forum/viewtopic.php?f=35&t=3275&hilit=speedy . I see he's got his teeth into some project now so I'm happy to take off where he left with black-un.

As usual Wayne had done a superb job on the engine and running gear so it's already been out on the road this Sunday with the top down cruising around South Manchester. Even my partner, Julie, loved driving it - so that means I get a free pass to spend as much time as I like keeping it in tip-top condition. :-D

My current ethos is to the keep car as close to "original" Mk1 as possible + leave the really hard stuff to Wayne! At the moment I want to spend time sorting the interior which is showing it's age and need a little love and attention. As we hitting the winter months I don't anticipate getting it out on the road much unless it's a clear and bright day. I'd rather spend the time preparing the car for Spring 2016 and those lovely mornings/evenings.

Next step is to post a few pics and then start asking everyone a ton of obvious questions which, no doubt, have have been asked a million times on the forum already. Please feel free to redirect me if needed. Anyway, I really looking forward to everyone's good advice and some banter along the way.

Sincere thanks to both Wayne and Speedy (+Ric my colleague) for convincing me to take this path and for all the help, support and myriad of ideas already.

Now where the hell do I start?
Creepy
User avatar
Speedy
Epic Poster
Posts: 1694
Joined: Thu Dec 15, 2011 9:24 am
Location: Newport, Shropshire

Re: Creepys new Black-un

Postby Speedy » Wed Oct 07, 2015 6:25 pm

Good choice in a Mk1, even better choice it's Black :bow-yellow:

Enjoy your new MX-5 I'm sure she will be good to you if you look after her well. :obscene-drinkingcheers:
1989 Fresh import with 30,000 km, Maruha Four Pot calipers, 270mm disks, Rose jointed drop links, Uprated ARB's, MeisterR CRD Coilovers, Rota wheels, LSD, Zoom console, Maruha Alternator, Jenvey ITB's, Megasquirt ECU
1st Modified Class Bristol OC Spring Rally
2nd Weston Park April 2017
1st 'Modern Classic' Stafford Castle Classic Show July 2018
3rd 'Best Japanese Classic' Tatton Park Aug 18
1st Modified Class Ragley Hall OC National SEP 18
1st Easter show Weston Park 2019
2nd 80's class Newport Easter show 2019


2011 2.0 RC Sport Tech in Aluminium, Smart Top.
User avatar
DavesBRG5
Moderator
Posts: 2311
Joined: Thu Dec 08, 2011 9:37 pm
Location: Cambridgeshire

Re: Creepys new Black-un

Postby DavesBRG5 » Wed Oct 07, 2015 6:56 pm

Good choice :text-goodpost:

Welcome to the addiction :auto-layrubber:
DAVE

1992 1.6 BRG V-Spec - 2003 MK2.5 Sport - 1992 ROADSTER 1.6.
User avatar
flea
Moderator Wannabe
Posts: 6618
Joined: Wed Dec 07, 2011 8:42 pm
Location: Medway towns, Kent

Re: Creepys new Black-un

Postby flea » Wed Oct 07, 2015 7:04 pm

Welcome to menders
Eunos 1.6 special 1989 with a few added extras
Eunos 1991 1.6
Eunos 1990 1.6 project
Mk2 1999 1.8
User avatar
blackyb
Moderator
Posts: 1525
Joined: Tue Sep 17, 2013 8:41 pm
Location: Scarborough

Re: Creepys new Black-un

Postby blackyb » Thu Oct 08, 2015 9:16 pm

Welcome buddy.

Its a Mk1 and that's all that matters!!!

:obscene-drinkingcheers:
1993 1.6 Eunos Roadster (gone)
1998 UK Mk 2 1.6 (gone)
2003 1.8 SVT Sport (shouldnt have sold it)
1991 1.6 Eunos Roadster with a bit of bling.

Life is a journey, best travelled topless in an MX5!!
User avatar
Creepy
Regular
Posts: 56
Joined: Mon Sep 28, 2015 8:49 pm
Location: South Manchester

Re: Creepys new Black-un

Postby Creepy » Mon Jan 11, 2016 11:10 pm

Seems like months since I made my first post (oooops it was!). So here's a couple of pics of the my new pride and joy :-)

Creepys Mk1 0810215 1.jpg
The back-un after a quick clean and polish
Creepys Mk1 0810215 1.jpg (158.29 KiB) Viewed 11846 times


WP_20151006_13_31_13_Pro.jpg
The black-un interior (which needs a little TLC)
WP_20151006_13_31_13_Pro.jpg (1.86 MiB) Viewed 11846 times


WP_20151006_13_32_16_Pro__highres.jpg
A sparkling engine - thanks to M-m
WP_20151006_13_32_16_Pro__highres.jpg (4.93 MiB) Viewed 11846 times


Clearly, a super-sound car with a willing engine and excellent bodywork - what more could one ask for?

So what have I been up-to in the last couple of months? That's the subject of my next post(s), but rest assured I've been rather busy on the interior and have plenty of pics to share :-)
User avatar
Mazda Mender
Site Admin
Posts: 15090
Joined: Tue Dec 06, 2011 6:18 pm
Location: Pie land, in the glen of Wiganshire
Contact:

Re: Creepys new Black-un

Postby Mazda Mender » Tue Jan 12, 2016 12:07 am

Lets see um .
M-m
The Disclaimer:-
This post is a natural product made from recycled electrons. The slight variations in spelling and grammar enhance its individual character and beauty and in no way are to be considered flaws or defects, the articles/answers/comments are provided for information purposes and they are not intended to substitute informed professional advice, I or mazdamenders.net cannot personally be hold responsible for any damage occurred from following this procedure or any injuries from it. Proceed at your own risk.


Mk 1 Eunos 93 black V.S II 1.8 ,
Mk 2 .1/4 Roadster 99 black & gold V.S 1.8 .
Mk 1 Eunos 90 1.6 soul red ..f/ build
MK 2.1/4 Blue V.S Roadster 1.8 99 ..
MK1 1.8 ,white import.. (Ashleighs)
MK1 1.6 yellow J ltd import.f/build
MK 1 1.8 black Tokyo Ltd..f/build


http://www.mx5oc.co.uk/ http://www.mx5nutz.com/forum/ http://miata.net/ http://www.autolinkuk.co.uk/
User avatar
Creepy
Regular
Posts: 56
Joined: Mon Sep 28, 2015 8:49 pm
Location: South Manchester

Re: Creepys new Black-un

Postby Creepy » Wed Jan 13, 2016 12:39 am

My first task: New interior door cards

Firstly: My thanks to all those who go before me and have already posted threads and blogs on the same subject. Total credit to all those dedicated folk for sharing their intel and experiences. 

Not sure why I chose the door cards as my first project for the black-un but I guess it was because they were looking a touch shabby with the usual problem of the top plastic section having some of it lugs bust and also the board themselves had gone “soft” presumably due to age and getting damp over the years. A number of the retaining holes for the plastic fixings were shot so I had no choice but to replace.

I decided to use hardboard for the main card and simply use the old one as the template. I also sprayed the hardboard door cards in an effort to protect them a little from damp and any minor water ingress. Not sure how well it work but I guess time will tell.

WP_20151014_21_15_56_Pro.jpg
Marking out the new door card
WP_20151014_21_15_56_Pro.jpg (1.39 MiB) Viewed 11817 times


I deviated slightly from the original design and used thicker foam between the card and final covering. Again I purchased a couple of square metres off t’internet and cut to shape based upon the card template. The end result is good and the cards have a much softer and luxurious feel in my opinion. Perhaps they will prove a tad quieter too? (Watch future posts for how I’ve used the remainder of the foam…. hint: heat exchanger”).

WP_20151015_20_27_21_Pro.jpg
Foam padding
WP_20151015_20_27_21_Pro.jpg (1.34 MiB) Viewed 11817 times


For the covering I purchased a chunk of faux leather (Cheaper and easier to use than real leather!) and again used the old covering as a template. Ultimately I discovered that impact adhesive was by far-and-away the best way to stick the material to the back of the card (I had to bin my first attempt using staples which proved far too long and stuck out the other side.....ouch)!!

WP_20151015_19_50_09_Pro.jpg
Card and faux leather ready to be cut
WP_20151015_19_50_09_Pro.jpg (1.28 MiB) Viewed 11817 times


WP_20151015_22_48_43_Pro.jpg
Faux leather covering cut to size (used the old one as a template)
WP_20151015_22_48_43_Pro.jpg (1.52 MiB) Viewed 11817 times


In terms of the long plastic top trim (that sits on the top of the door inner skin) I spent an age thinking about how to fix/repair the broken lugs that hold the stubby screws ultimately attaching the main card to this strip. I know that folk use duct-tape and it works perfectly well, but I just couldn’t give-up on this little problem. I settled on using a few metal washers slightly larger than the lugs (which could sit over the what was left of the lug) and then filling/binding them using epoxy resin. Once set, I left it a few days to be 100% sure it was fully cured, I carefully drilled new holes through the resin – and hey presto a new lug is born! So far it’s worked really well and the new door card and trim are joined perfectly. NOTE: I also decided to use a few washers on the back of the door card to spread the load in an effort to try and stop the card ultimately breaking/pulling through at this weak point. I'll probably add washers to all the screw points prior to final fitting ?

WP_20160112_23_25_52_Pro.jpg
Back of Passenger door card
WP_20160112_23_25_52_Pro.jpg (1.37 MiB) Viewed 11817 times


After some careful polishing of the teardrop and purchasing a few new trim clips, I’m pleased with the end result. I guess time will tell how well they stand up to the rigours of the Northern damp climate but I’m confident all will be fine at least for one summer :-)

WP_20160112_22_39_35_Pro.jpg
Completed Drivers door card
WP_20160112_22_39_35_Pro.jpg (1.37 MiB) Viewed 11817 times


Whilst the trim was off I also completely removed the winder mechanisms and gave them a thorough cleaning an re-grease so they work like new. Also installed a central locking kit which proved a bit of a pain in terms of adjustment, but got there in the end. Also added sound deadening material on the door panel at the back of the speaker to improve sound quality in the cabin.

P.S. Not sure if anyone has discovered how to remove the black bitumen goo that sticks the water shield to the door skin. However, I found that if you remove the majority with a plastic tool (like the ones used to pry off the door trim clips) and then use small amounts of "Carb cleaner" on a rag to remove the rest from the door...it works a treat. The door skin came up like new. SAFETY NOTE: Wear plastic gloves and use the carb cleaner in a VERY well ventilated spot (sadly it's not a very green product!). You can also buy a role of the new "goo". I found it really easy to fix to the door and the new plastic water seal/guard is now firmly attached and looks really neat ( I can post a link if anyone is interested on where to buy this stuff).

Next job/post : Reupholstering the seats
User avatar
Mazda Mender
Site Admin
Posts: 15090
Joined: Tue Dec 06, 2011 6:18 pm
Location: Pie land, in the glen of Wiganshire
Contact:

Re: Creepys new Black-un

Postby Mazda Mender » Wed Jan 13, 2016 8:05 am

You should not remove that tacky seal, it is just that a seal and the membrane, if i remember right they were missing and i had to make some up to stop damp getting into her, as the rain can run straight in behind the door card and into the roadster if they are missing or not sealed.
Nice work buddy.
M-m
The Disclaimer:-
This post is a natural product made from recycled electrons. The slight variations in spelling and grammar enhance its individual character and beauty and in no way are to be considered flaws or defects, the articles/answers/comments are provided for information purposes and they are not intended to substitute informed professional advice, I or mazdamenders.net cannot personally be hold responsible for any damage occurred from following this procedure or any injuries from it. Proceed at your own risk.


Mk 1 Eunos 93 black V.S II 1.8 ,
Mk 2 .1/4 Roadster 99 black & gold V.S 1.8 .
Mk 1 Eunos 90 1.6 soul red ..f/ build
MK 2.1/4 Blue V.S Roadster 1.8 99 ..
MK1 1.8 ,white import.. (Ashleighs)
MK1 1.6 yellow J ltd import.f/build
MK 1 1.8 black Tokyo Ltd..f/build


http://www.mx5oc.co.uk/ http://www.mx5nutz.com/forum/ http://miata.net/ http://www.autolinkuk.co.uk/
User avatar
Yolo
Epic Poster
Posts: 1123
Joined: Sun Mar 17, 2013 10:39 pm
Location: Co.Antrim

Re: Creepys new Black-un

Postby Yolo » Wed Jan 13, 2016 8:24 pm

Hi this looks great I did my door cards last year and had to replace the membrane. I also cleaned a lot of the excess goo as the previous owner had it everywhere. I could do with some to help seal things off properly so would welcome the link to where to get it as I couldn't find it.

Good job here buddy. :handgestures-thumbup:
Mk 1 Eunos 1.6 Silver
Meister Suspension - Mk2.5 leather seats - IL Motorsport Bushes - 1.8 brake upgrade
Getting there slowly
viewtopic.php?f=35&t=4699
User avatar
Creepy
Regular
Posts: 56
Joined: Mon Sep 28, 2015 8:49 pm
Location: South Manchester

Re: Creepys new Black-un

Postby Creepy » Wed Jan 13, 2016 10:18 pm

Hey Yolo...this is what I bought http://www.amazon.co.uk/Adhesive-Mastic ... op?ie=UTF8
Also check out this link : http://www.carbuildersolutions.com/uk/b ... r-strip-7m

Whilst I can't guarantee it's effectiveness in the rain (my motor is still in the garage whilst I complete the interior) it's really easy to apply to the door. You can cut lengths with a pair of scissors or sharp blade - just don't leave any gaps obviously. My polythene membrane is now stuck fast and I'll be surprised if it ever comes off again. It's certainly looks to have sealed extremely well. If I get chance at the weekend I'll take a photo and post it here.

You can also buy the butyl sealant in a tube - just do a search for "Butyl sealant" and/or "car butyl sealant".

I do agree with M-m that this goo shouldn't be removed unless really necessary (and ALWAYS replaced) but I'm a bit OCD and wanted my doors skin to look all neat and tidy (not that I'll see much if it!)

Hope that helps.
Cheers
User avatar
Creepy
Regular
Posts: 56
Joined: Mon Sep 28, 2015 8:49 pm
Location: South Manchester

Re: Creepys new Black-un

Postby Creepy » Wed Jan 13, 2016 11:31 pm

Second task: Re-upholstering the seats.

This was one task I really needed to do but not sure whether I should! After a ton of reading other posts and blogs on the same subject I took the plunge. Out came the cheque book and I purchased a set of new leather seat covers with white stitching (including a gear and handbrake gaiter - which was nice). Whilst I was at it I also purchased 2 sets of heated seats kits which seemed sensible considering this would be a "once only" job.

The original seats were relatively worn with the drivers side showing a couple of bare patches and a tear. Once the covers were removed it was clear the drivers seat had been very well used. There were a few rips in the foam of the side bolsters and seat. These were glued up and where necessary I filled in a couple of "small holes" with some new foam cut to shape. I also cleaned up the metal seat pans, which were a little rusty (hopefully it was only coffee that had been spilt??). I used a wire cup brush on a drill to clean them up - and then gave the pans a few coats of spray.

NOTE: Watch out as the edges of the seat pan are VERY sharp, I took the advice from my instructions and wore gloves wherever possible during the entire process.
NOTE2: Wear goggles when cutting the old hog rings - they fly off in all directions. One piece of shrapnel hit my face so I then covered them with a rag when making the cut (with a GOOD pair of small bolt croppers)

Fitting the heated seats was rather straightforward and needed very little cutting. They simply stick to the back and seat cushions.

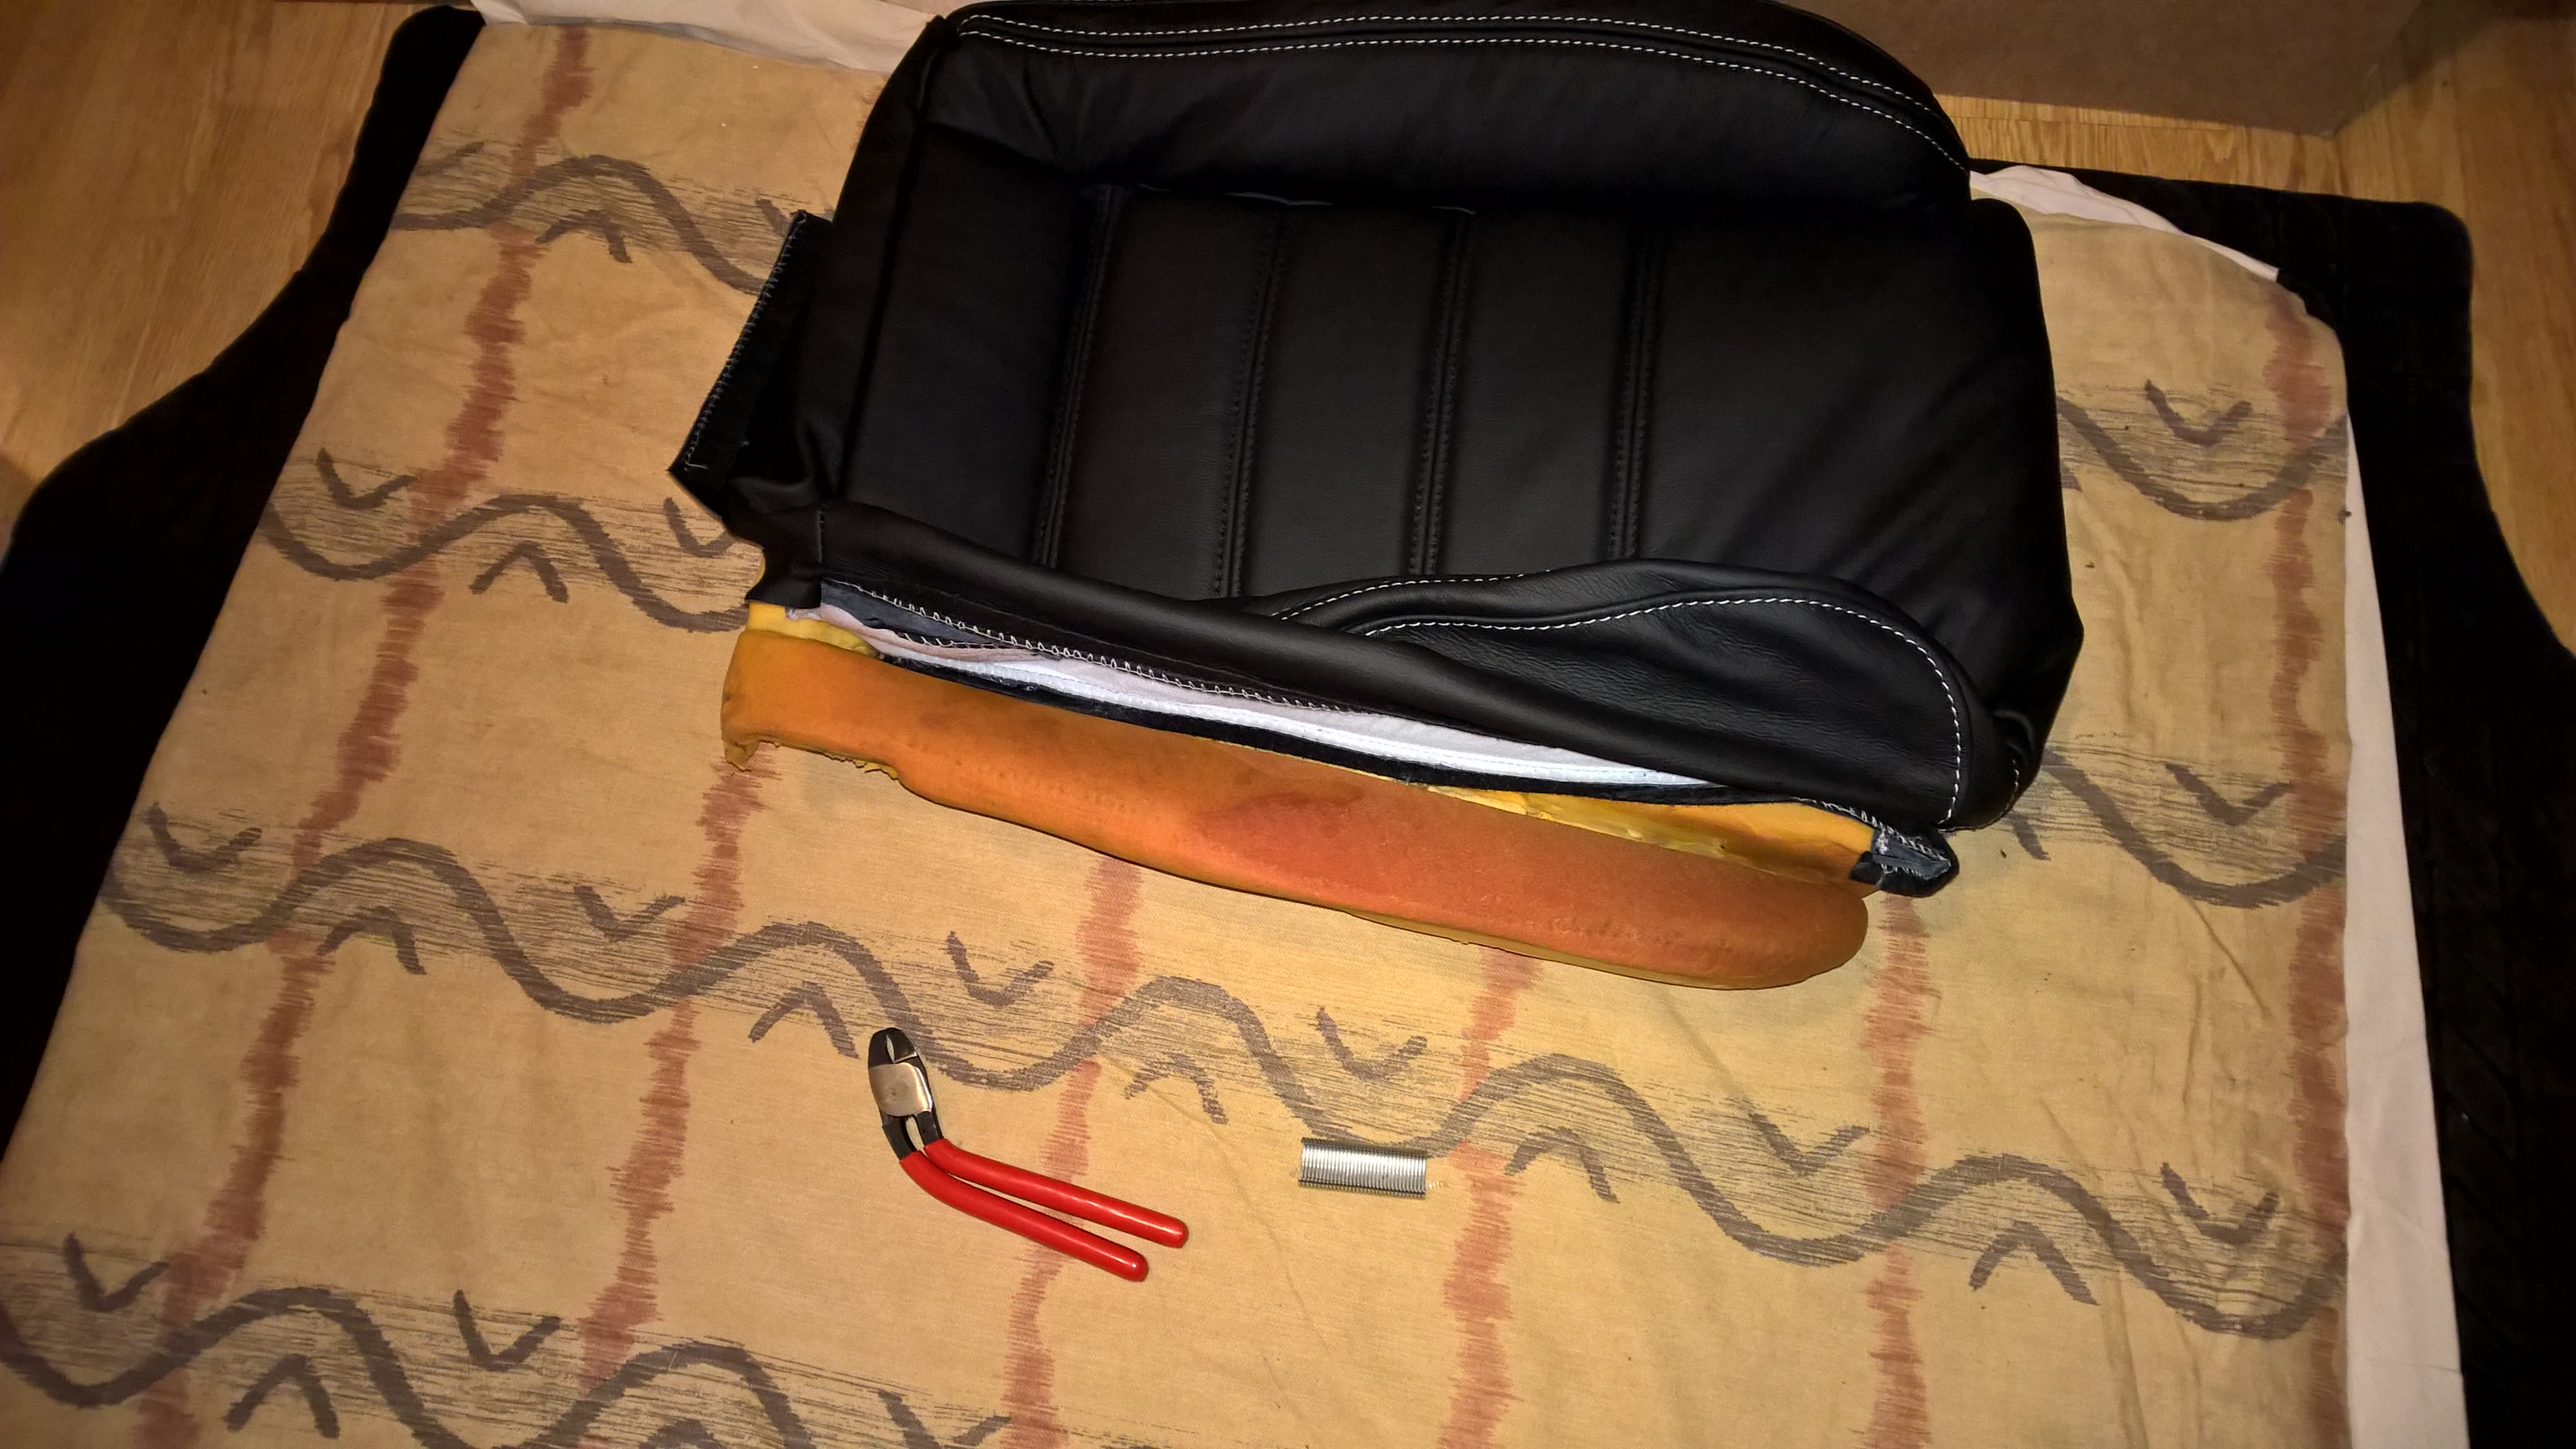
One other problem was that the metal rods that are within the seat cushion (to hold the hog rings) were tearing through the seat. I solved this by threading a couple of cables times over the rods and out of the bottom of the seat and then through a small piece of scrap hardboard. This worked really well. See picture below.

WP_20151016_19_35_15_Pro.jpg
Re-Securing the seat rods that the hog rings attach to
WP_20151016_19_35_15_Pro.jpg (1.27 MiB) Viewed 11799 times


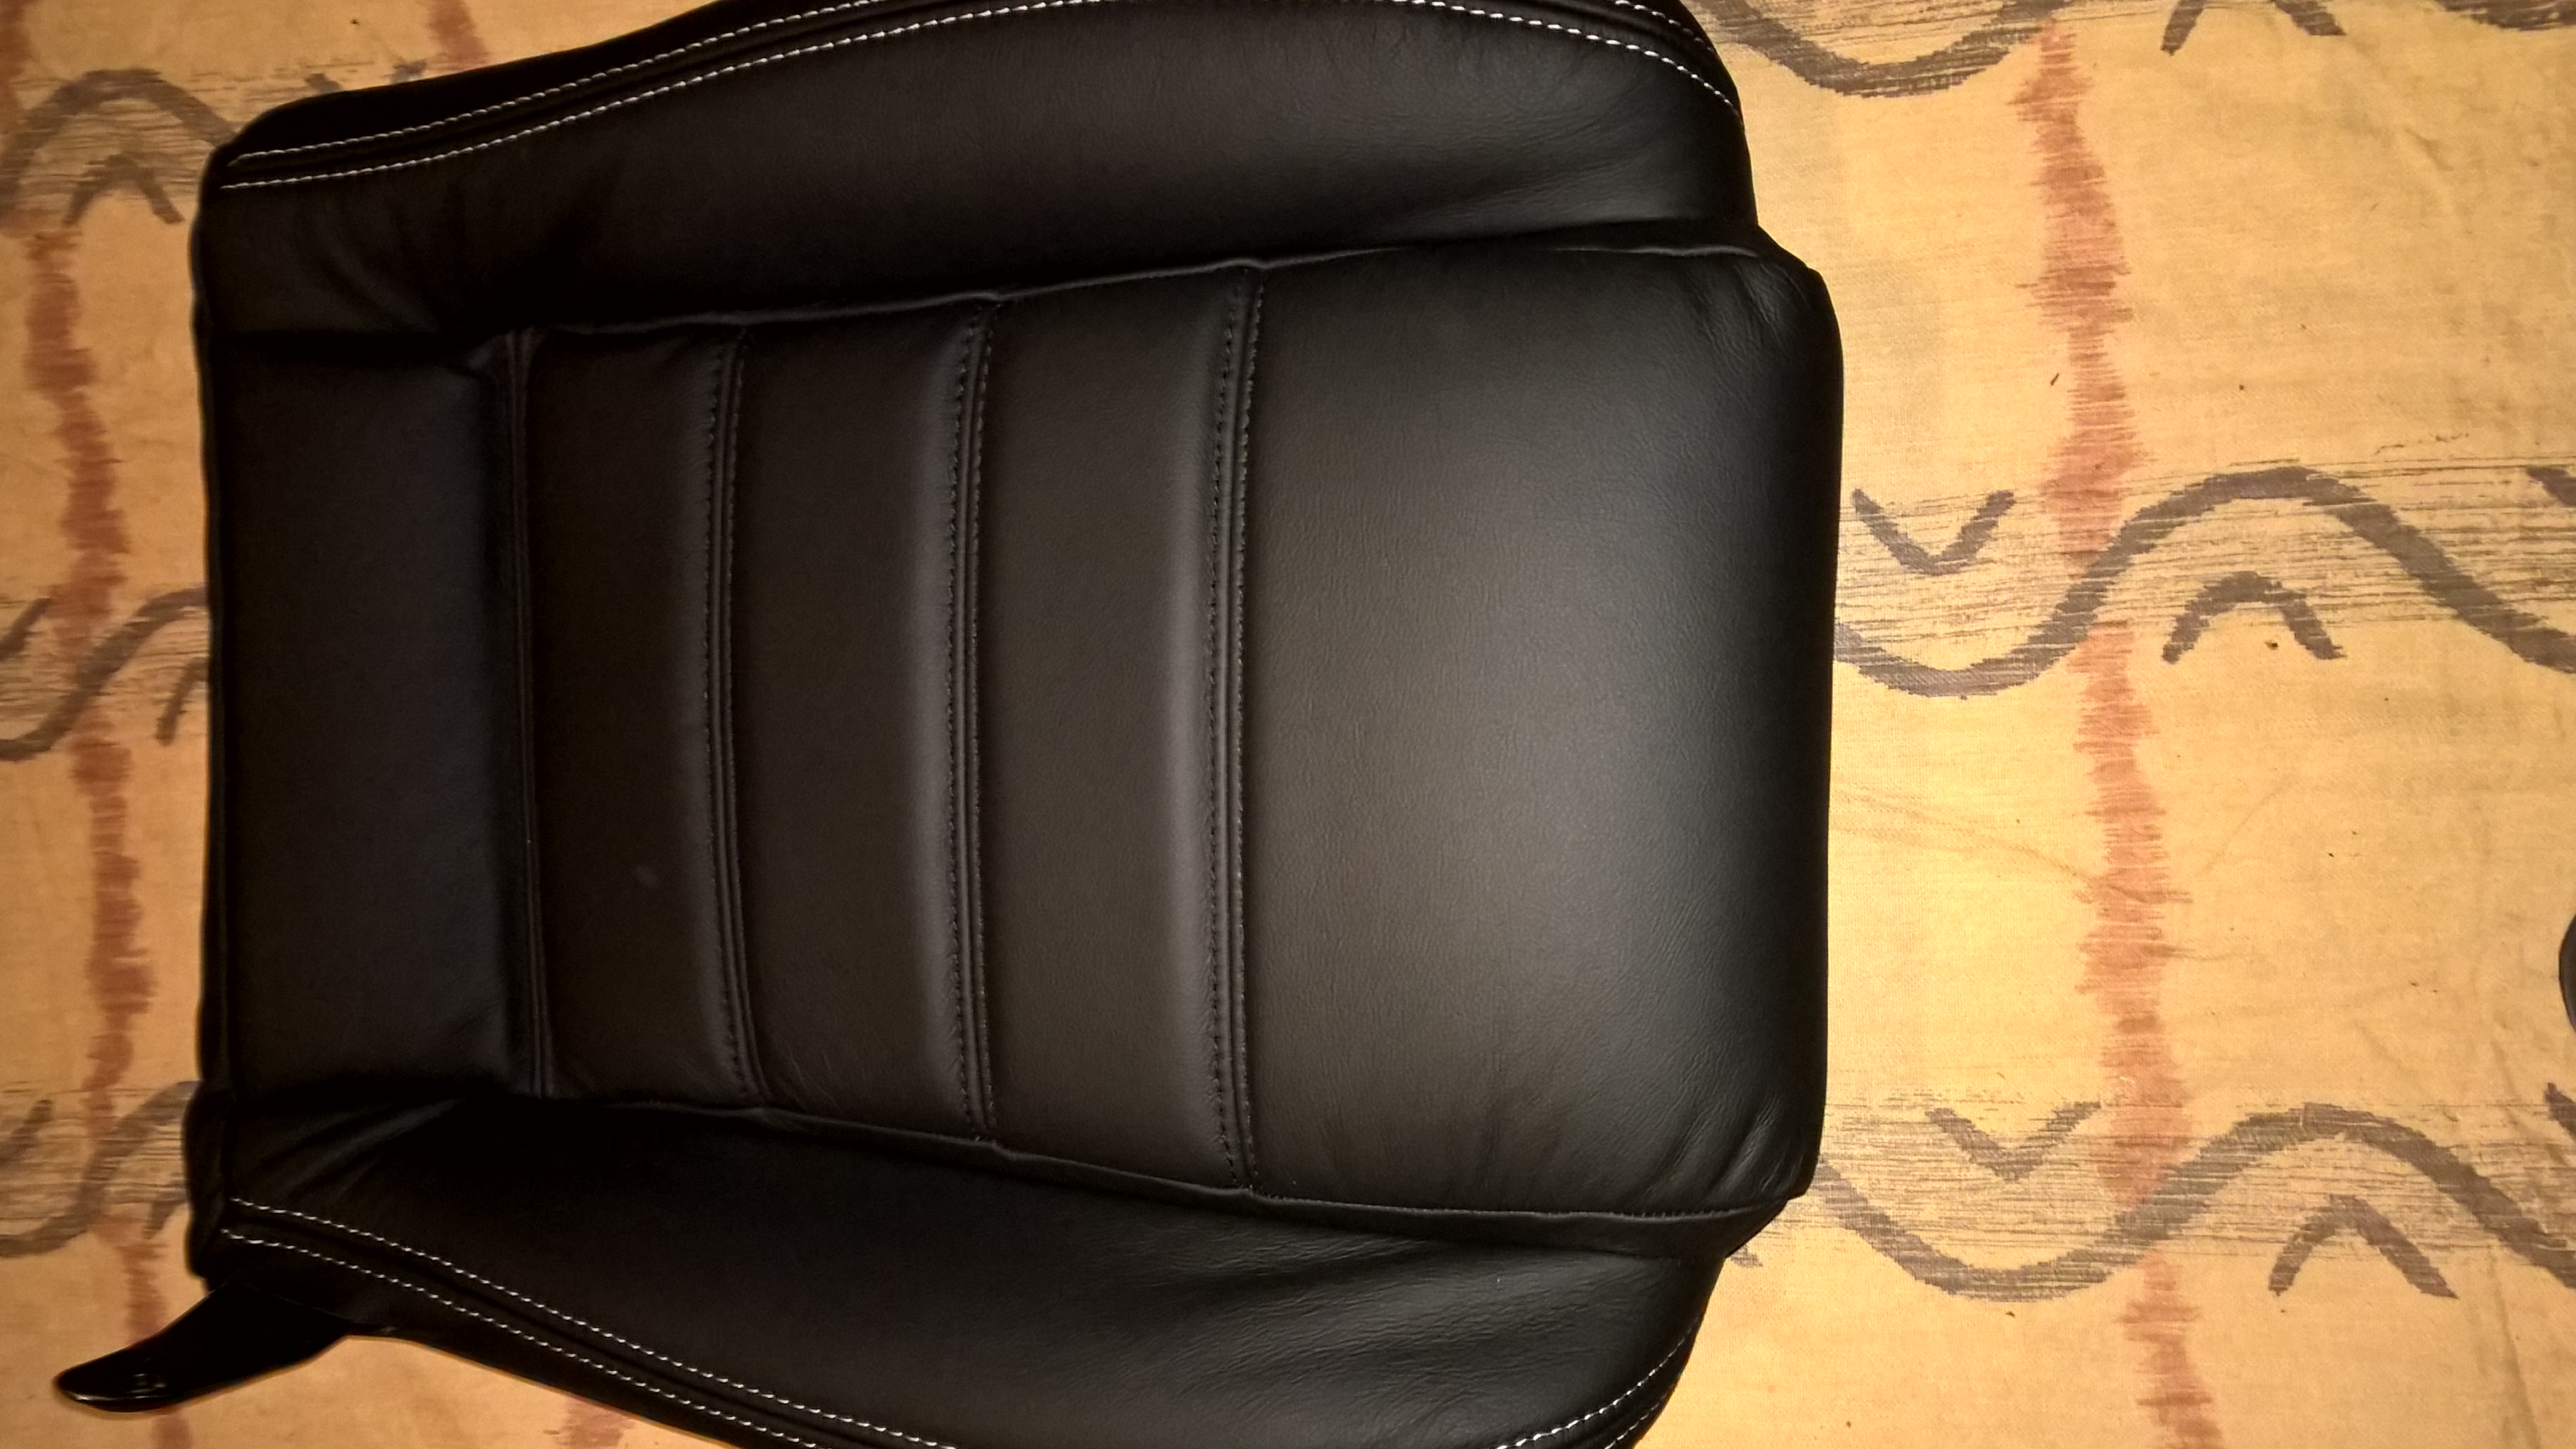
Next came the upholstering. Time and patience was the key here....it was really important to get the covers straight and uniform so I took ages trying several time with each seat cover to get it right.

WP_20151104_22_11_23_Pro.jpg
Seat pan sprayed and new leather cover loosely in place
WP_20151104_22_11_23_Pro.jpg (1.42 MiB) Viewed 11799 times


Due to my mild OCD I decided NOT to go with the simple option of using cable ties to secure the covers to the seat and instead purchased some hog ring pliers and a set of rings. That proved fun. i just about got the hang of it by the time I'd done both seats...but well worth the effort and something else to add to my list of "been there done that". Truth be known I did cheat once or twice and used cables ties but I'm not telling anyone :-)

WP_20151016_19_14_37_Pro.jpg
Using the hog ring and pliers - not easy but fun
WP_20151016_19_14_37_Pro.jpg (1.57 MiB) Viewed 11799 times


WP_20151016_21_32_48_Pro.jpg
Base completed
WP_20151016_21_32_48_Pro.jpg (1.3 MiB) Viewed 11799 times


The back of the seat was an altogether different proposition to the seat base. Getting the seat back cover straight and fully down over the seat was a nightmare. it was such a tight fit to get the cover all the way down over the seat back AND keep it straight. I must have spent hours trying to get it right for both seats - but it had to be done. The hog ring fitting was easy in comparison to the seat base.

WP_20151017_14_00_02_Pro__highres.jpg
A completed seat back
WP_20151017_14_00_02_Pro__highres.jpg (5.14 MiB) Viewed 11799 times


The rest was relatively straightforward - simply putting the seats back together again. I also tested the heated seats by attaching to a 12v battery for 10 mins just to check they got warm (didn't want to do all the wiring in the car only to find they didn't work !)

I have to admit I'm really pleased with the end result, especially considering I've never done this before. Just to be safe, I've now purchased a set of proper seat covers which will remain firmly in place until the car is back on the road. I also haven't re-fitted the seats back into the motor yet as still plenty to do with the interior :-)


WP_20151017_20_19_21_Pro.jpg
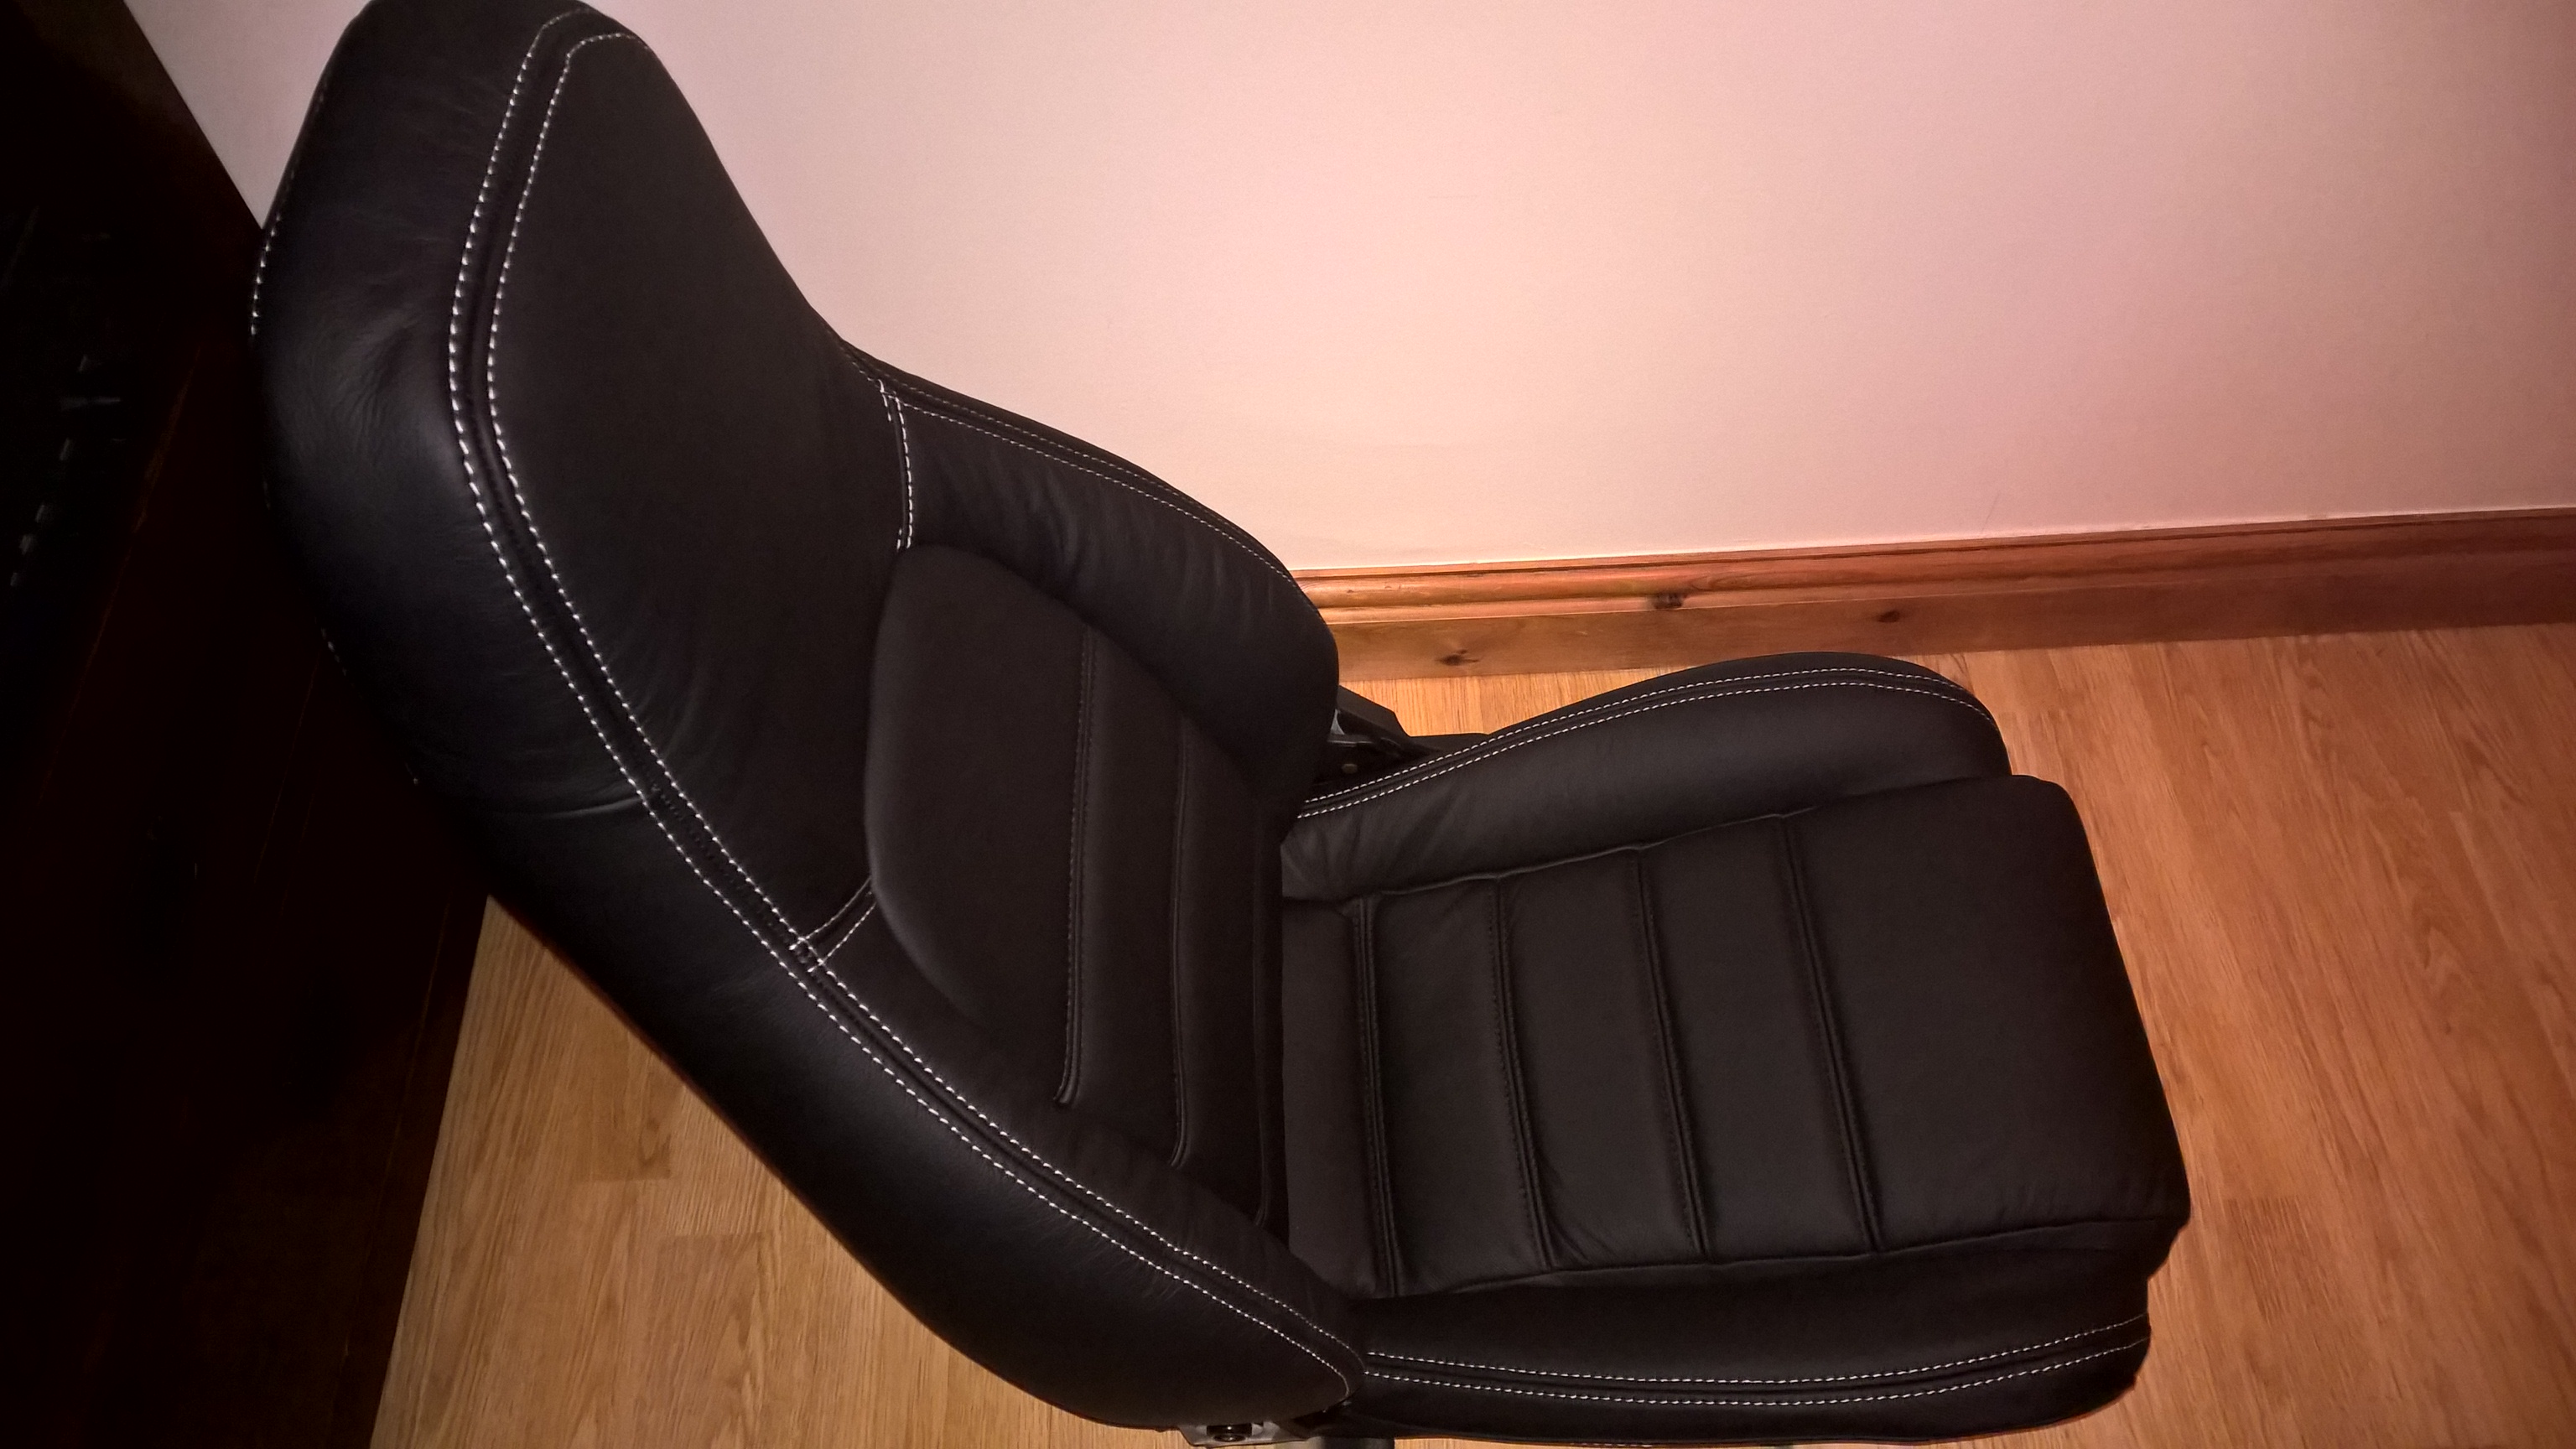
The completed article
WP_20151017_20_19_21_Pro.jpg (1.17 MiB) Viewed 11799 times


If anyone is considering doing the same feel free to give me a shout, I'd be happy to loan the hog ring pliers and chuck in a few hog rings if needed. However, I'm sure cable ties work perfectly well and they are certainly a lot easier to fit!


Special thanks to the crazy red Italian and miata.net for his post on how to upholster - superb instructions. I'd have been lost without their advice: http://www.miata.net/garage/upholstery.html
User avatar
Yolo
Epic Poster
Posts: 1123
Joined: Sun Mar 17, 2013 10:39 pm
Location: Co.Antrim

Re: Creepys new Black-un

Postby Yolo » Thu Jan 14, 2016 12:00 am

Creepy wrote:Hey Yolo...this is what I bought http://www.amazon.co.uk/Adhesive-Mastic ... op?ie=UTF8
Also check out this link : http://www.carbuildersolutions.com/uk/b ... r-strip-7m

Whilst I can't guarantee it's effectiveness in the rain (my motor is still in the garage whilst I complete the interior) it's really easy to apply to the door. You can cut lengths with a pair of scissors or sharp blade - just don't leave any gaps obviously. My polythene membrane is now stuck fast and I'll be surprised if it ever comes off again. It's certainly looks to have sealed extremely well. If I get chance at the weekend I'll take a photo and post it here.

You can also buy the butyl sealant in a tube - just do a search for "Butyl sealant" and/or "car butyl sealant".

I do agree with M-m that this goo shouldn't be removed unless really necessary (and ALWAYS replaced) but I'm a bit OCD and wanted my doors skin to look all neat and tidy (not that I'll see much if it!)

Hope that helps.
Cheers


Thanks buddy I'll check it out.... :obscene-drinkingcheers: :text-thankyouyellow:
Mk 1 Eunos 1.6 Silver
Meister Suspension - Mk2.5 leather seats - IL Motorsport Bushes - 1.8 brake upgrade
Getting there slowly
viewtopic.php?f=35&t=4699
User avatar
Mazda Mender
Site Admin
Posts: 15090
Joined: Tue Dec 06, 2011 6:18 pm
Location: Pie land, in the glen of Wiganshire
Contact:

Re: Creepys new Black-un

Postby Mazda Mender » Thu Jan 14, 2016 7:59 am

I find just twisting the hog rings open with pliers and then just un-hooking them is far quicker and safer, as they do not take to much effort to twist and open up.
Wire ties work just as well if not easier, just make sure you don't use the £1 shops crap ;0).

Nice write up buddy.
M-m
The Disclaimer:-
This post is a natural product made from recycled electrons. The slight variations in spelling and grammar enhance its individual character and beauty and in no way are to be considered flaws or defects, the articles/answers/comments are provided for information purposes and they are not intended to substitute informed professional advice, I or mazdamenders.net cannot personally be hold responsible for any damage occurred from following this procedure or any injuries from it. Proceed at your own risk.


Mk 1 Eunos 93 black V.S II 1.8 ,
Mk 2 .1/4 Roadster 99 black & gold V.S 1.8 .
Mk 1 Eunos 90 1.6 soul red ..f/ build
MK 2.1/4 Blue V.S Roadster 1.8 99 ..
MK1 1.8 ,white import.. (Ashleighs)
MK1 1.6 yellow J ltd import.f/build
MK 1 1.8 black Tokyo Ltd..f/build


http://www.mx5oc.co.uk/ http://www.mx5nutz.com/forum/ http://miata.net/ http://www.autolinkuk.co.uk/
User avatar
Mazda Mender
Site Admin
Posts: 15090
Joined: Tue Dec 06, 2011 6:18 pm
Location: Pie land, in the glen of Wiganshire
Contact:

Re: Creepys new Black-un

Postby Mazda Mender » Thu Jan 14, 2016 8:25 am

Creepy wrote:Whilst I can't guarantee it's effectiveness in the rain (my motor is still in the garage whilst I complete the interior) it's really easy to apply to the door. You can cut lengths with a pair of scissors or sharp blade - just don't leave any gaps obviously. My polythene membrane is now stuck fast and I'll be surprised if it ever comes off again. It's certainly looks to have sealed extremely well. If I get chance at the weekend I'll take a photo and post it here.


So is this a solid fix? or not far off how the OE stuff works ? as in it can still be pulled apart for any repairs IE- door lock/springs,window mechs etc that maybe needed with in the doors.
M-m
The Disclaimer:-
This post is a natural product made from recycled electrons. The slight variations in spelling and grammar enhance its individual character and beauty and in no way are to be considered flaws or defects, the articles/answers/comments are provided for information purposes and they are not intended to substitute informed professional advice, I or mazdamenders.net cannot personally be hold responsible for any damage occurred from following this procedure or any injuries from it. Proceed at your own risk.


Mk 1 Eunos 93 black V.S II 1.8 ,
Mk 2 .1/4 Roadster 99 black & gold V.S 1.8 .
Mk 1 Eunos 90 1.6 soul red ..f/ build
MK 2.1/4 Blue V.S Roadster 1.8 99 ..
MK1 1.8 ,white import.. (Ashleighs)
MK1 1.6 yellow J ltd import.f/build
MK 1 1.8 black Tokyo Ltd..f/build


http://www.mx5oc.co.uk/ http://www.mx5nutz.com/forum/ http://miata.net/ http://www.autolinkuk.co.uk/

Return to “Members Mx-5/ Roadsters”

Who is online

Users browsing this forum: No registered users and 8 guests